Wondering how to get a sleek, professional look with your own window film? You can do it yourself by carefully measuring, cutting, and applying the film to your clean window surface.
The process involves a bit of patience and precision but can save you money and give your space a fresh upgrade.
Keep reading for all the tips and tricks you need to master the job easily.
How to Clean Your Window for Film Application
To ensure your window is perfectly clean for film application, start by mixing a solution of distilled water with a few drops of baby shampoo—avoid tap water to prevent mineral residues that can cause stains. Use a non-linting towel like Scott or WIP-All to wipe the glass surface gently, preventing fiber lint from sticking to the film later. For stubborn grime, thoroughly scrape the wet glass with a razor scraper, paying close attention to corners and edges where mold tends to gather. Handle the razor carefully to prevent cuts, and always use it at a shallow angle to avoid scratching the glass. Never use ammonia-based cleaners, as they can damage the adhesive on the film; instead, ensure you always use ammonia-free products as recommended by manufacturers. Opt for ammonia-free, mild cleaning solutions to preserve the film’s stickiness. Once cleaned, dry the window completely with a soft microfiber cloth, wiping in a single direction to minimize lint and streaks. Before applying the film, inspect the surface carefully for any remaining residue. If needed, spray a final coat of soapy water over the glass to keep it wet for easier film application and to help with positioning. For best results, remove any stubborn adhesive from previous window film using a plastic scraper and a mild adhesive remover. For a smoother application, always use distilled water in your soapy solution to avoid mineral spots beneath the film. When choosing a cleaning solution, consider that style and function are both important factors in maintaining a spotless workspace.

What You'll Get: One 23 oz spray bottle of Windex Ammonia Free Crystal Rain Glass and Window Cleaner

Streak-Free Window Washing: Remove tough dirt and grime with this professional window washing solution that leaves no streaks, foam, film, or residue. A little soap goes a long way with your cleaning tasks around the home

Streak-Free Window Washing: Remove tough dirt and grime with this professional window washing solution that leaves no streaks, foam, film, or residue. Ideal for cleaning windows and glass, a little soap goes a long way
How to Measure and Cut Window Film Without Waste
Use the factory straight edge of the roll as your guide for cutting. For precise cuts, extend a razor blade about ½ inch into the box, then pull the film to your desired length plus an additional two inches. Let the blade glide through the film without applying force to ensure a clean cut. Angle the blade at roughly 45 degrees to achieve smooth, professional edges. To minimize waste, pre-cut the film slightly smaller than the glass—about 1/16 inch less on all sides—so you only generate a maximum of about two inches of leftover material per panel. Always plan cuts to minimize waste, as factory edges simplify alignment and reduce trimming during installation. When choosing between this method and a table, remember that style and cost also influence the final look of your space. Properly diffused light from a window film can act as ambient light, softening harsh shadows and setting the room’s overall mood. For a more polished appearance, consider how the film’s quality and performance compare to the best-rated night lights in your home for consistency.

Professional knife for car vinyl, window tint, and window decals.
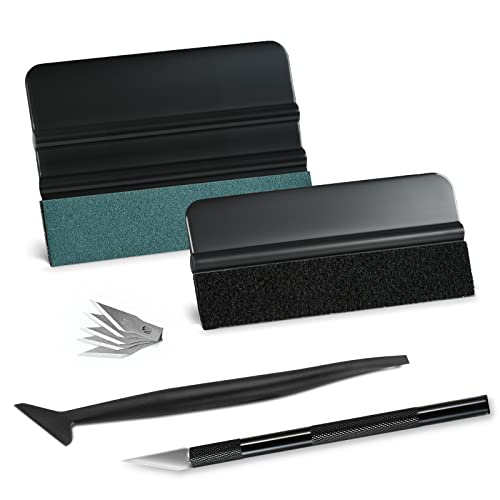
GREAT VALUE 9 IN 1 WINDOW FILM APPLICATION TOOLS: this window tint kit includes 2 kinds of vinyl wrap squeegee, 1pc long stick micro squeegee, 1pc craft knife and 5 spare sharp blades for replacement.

Extended use and safety lock Knife: prevent the blade slipping with safety lock tab.
How to Apply Window Film So It Stays Put
Start your window film application at the top of the glass and press the wet film onto the wet surface. The soap solution temporarily prevents sticking, allowing you to slide the film into the correct position. Use a smoothie squeegee to push from the center outward, which helps remove water and promotes better bonding between the film and glass. Initially, don’t press all the way to the edges; instead, make horizontal strokes along the top to lock the film in place. Keep tension even during positioning to avoid stretching the film. On older windows, ensure that all adhesive residue is thoroughly cleaned off before application, or else the film may not adhere properly. Using a scraper blade or razor to remove old adhesive is an effective cleaning method before starting. Firmly press the film into edges and corners, trimming any excess with a utility knife 2 millimeters from the frame. For sharp corners, slide a five-way tool into each corner while pressing the film down. The film will start sticking within approximately 30 minutes and will fully cure in four to eight days. To avoid bubbles and wrinkles, maintain a gap of about 1/16″ from the frame when trimming each side. If you notice flickering after installation, it may be caused by incompatible dimmer switches that create voltage fluctuations interfering with the film’s adhesive curing process. Before applying the film, switch off the power to the lighting circuit to ensure safety during preparation, just as you would when replacing a ceiling light.

【9 in 1 Window Tint Tools】: Package included 9 pcs window tint tools, blue rubber squeegee, blue squeegee with soft cloth, white card squeegee, yellow corner squeegee, black fish-shape squeegee, mini pink squeegee, tint removal blade, 500ml spray bottle, carving knife.

Ready for a perfect window film installation: The HTVRONT window film kit includes 1* 5.5 inches Felt Squeegee, 1* 7 inches Detachable Ergonomic Knife,1* Replacement Blade and 1* 100ML Spray Bottle. The window privacy film installation tools are designed for making window film applications like a breeze
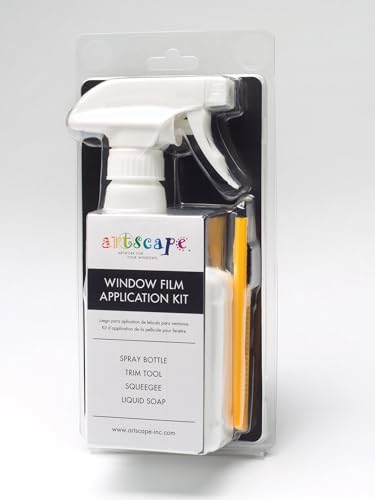
RECOMMENDED KIT FOR ARTSCAPE WINDOW FILM: Created by the brand for the most successful installation of Artscape window films. This kit will also work for most static cling window films on the market.
How to Squeegee Film Flat (Bubbles and Water Removal)
To squeegee the film flat and remove trapped water and bubbles, follow these steps. Hold a 3–4 inch medium-firm squeegee at a 45-degree angle. Begin by working from the center of the film outward, applying overlapping strokes of 6–8 inches. Keep your strokes steady and consistent, moving from the top to the bottom of the panel. Avoid squeegeeing within 2 inches of the edges at this stage to prevent lifting the film. Wipe the blade clean after each pass to prevent dirt and residue from scratching the surface. Bubbles that appear soon after installation are usually water bubbles that will clear on their own with warmth and sunlight. For a similar approach to household projects, consider building a curtain rod as an alternative to store-bought options.
For stubborn bubbles, applying heat is essential. Warm the film to 120–130°F using a heat gun for 30 to 45 seconds; this softens the adhesive, making it easier to smooth out bubbles. Immediately follow with firm, even pressure on the squeegee while the film remains pliable. This technique helps force out trapped moisture and air. For large air pockets, poke a tiny pinhole at the center of the bubble and gently smooth the area outward. Lightly misting the surface can also help the film slide smoothly. With patience and these techniques, you’ll achieve a flat, flawless finish.

Main Function: This plastic squeegee can help you easily clean water from car windshield, windows, mirrors, tiles without leaving scratches on the surface. Besides, the felt scraper can effectively squeeze out the air bubbles generated when applying the film, so that the surface of your car stays flat and smooth

Professional No-Bubble Tint Installation: Designed for automotive window film work, this professional tint squeegee helps remove trapped water and air under the film, allowing installers to achieve clean, no-bubble tint results on car windows

Multipurpose squeegee for wiping windows, windshields, mirrors,tiles, shower surfaces and more
How to Trim and Seal Window Film Edges
To trim and seal window film edges effectively, start by preparing your trimming knife with four or five fresh blades to ensure a clean cut. Leave an edge overlap of about 1 inch on all sides of the film before trimming. Begin by cutting the bottom and sides first, using a straight edge guide with a 1/8-inch thickness to create a narrow border. Keep your blade angle under 45 degrees to prevent tearing and achieve a smooth finish. For corner rounding, follow a slightly rounded path along the deep sides—avoid cutting directly into the corner to maintain integrity. After trimming, sand any rough burrs to smooth the edges. Use a plastic blade holder to prevent scratches on the film during cutting. For stubborn residue during cleaning, a mild soap solution can be used to avoid damaging the film surface. Ensure your work area has adequate recessed lighting to clearly see any film imperfections during trimming. For a dust-free film surface, dusting with a microfiber cloth before trimming helps prevent debris from interfering with the cut.
Next, seal the edges using the “bumping” technique. Wrap a hard card in a microfiber towel and press firmly along the edges, pushing to release trapped slip solution and ensure a secure bond. Apply heat with a heat gun to help the film conform and bond to the surface. During this process, wipe away any excess water with paper towels for a neat finish. Finally, inspect your work for a flush, leak-free edge, adjusting as necessary to achieve a professional-looking seal.

Complete Window Privacy Film Kit: 3-piece tool set includes a suede squeegee, a lockable utility knife and a 120ml spray bottle, everything needed to install window film with no extra tools to buy

MULTIFUNCTIONAL SET: A set of professional tool kit for both professional and DIY wrappers. Suitable for application of B0BTPHLPBCall types of window tint,decals,signs, wrap film and car vinyl cutting.

Complete Vinyl Wrap Tool Kit: This window tint kit includes a metal utility knife, 10 snap-off blades, a blue felt squeegee, and a yellow triangle smoothing tool. The compact car window tint kit combines practical window tint tools, tint tools, vinyl wrap tools, and wrap tools for car tinting, vinyl film, wallpaper application, and other installation projects.
How Long Until Your Window Film Is Fully Cured?
Your window film typically fully cures within 3 to 7 days under standard conditions. This timeline can vary based on environmental factors and the type of film used. Warmer temperatures and direct sunlight speed up the curing process, while colder or humid weather can slow it down. The adhesive needs sufficient time to bond completely to the glass surface, so it’s best to avoid rolling down your windows for at least 3 to 4 days after installation. Heavier films, such as safety or multi-layer options, may take over a month to cure fully. Look for a uniform matte appearance with no moisture, bubbles, or haze—these signs indicate the film has fully cured. It’s important not to clean the film for at least 30 days, and avoid ammonia-based cleaners, which can damage your tint. Visible imperfections like streaks or waters will diminish during the drying and settling process. If bubbles or other issues persist after a week, consulting a professional is recommended to ensure proper adhesion and curing.