Thinking about updating your windows but unsure where to start? A simple DIY window valance might be just what you need to give your space a fresh look without a big investment.
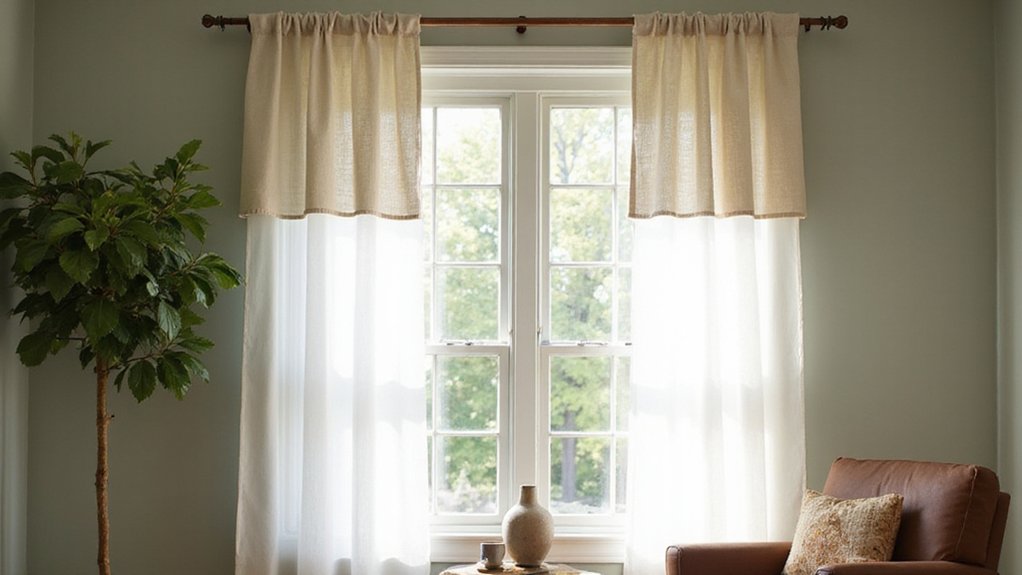
You can create a sleek, modern valance in under 30 minutes using a no-sew board wrap technique. It’s easy to customize in warm tones like forest green and perfect for adding style and functionality.
Keep reading for the full steps to get it just right.
Why Window Valances Are Making a Comeback in 2025
Valances are making a strong comeback by embracing clean, modern designs that steer clear of outdated ruffles. Instead of frills and swags, you’ll see box-shaped and flat panel styles that offer a sleek, tailored look. Micro-piping and subtle banding replace heavy trim, giving the window treatments a minimalist feel. Bold geometric patterns like lattices, oversized chevrons, and stripes inject a sense of structure and visual interest. Color palettes have shifted toward warmer tones such as forest greens and rich reds, moving away from cold blues, while neutral shades like beige and soft gray remain popular anchors. Aside from aesthetics, updated valances also provide functional benefits—they help insulate against drafts, conceal hardware, reduce unwanted glare, and can define spaces within open-plan rooms. To ensure the lighting behind valances performs well, consider using a night light that offers consistent quality and avoids buzzing or flickering. To prevent unwanted visual distractions, be aware that similar buzzing or flickering issues from LED bulb flickering can occur if dimmer switches are incompatible with the lighting near valances. When shopping for valances, consider whether you need a dedicated desk space instead, as a vanity may not offer the same work-friendly surface. This practical yet stylish approach demonstrates that valances are more than decorative elements; they serve as modern solutions for enhancing your windows and living space.
Materials You Actually Need for Any Valance Project
To build a sturdy valance frame, cut three wood pieces: one front board and two equal return sides. The front board should match the desired length of your valance, while the return sides are typically 2 to 4 inches long to provide depth. Use foam board as a lightweight alternative if you prefer easier handling. For those who want an even simpler option, consider choosing from top roller blinds instead of building a fabric valance from scratch. For DIY enthusiasts, soldering the connections ensures a more durable bond when joining multiple sections of low-voltage lighting. For valances that require a wooden frame, selecting the best wood for blinds ensures long-lasting durability and resistance to warping.
For hardware, install L-brackets about half an inch from each end of the return sides and the front board for secure hanging. If you plan to hang the valance on a rod pocket, mount the hardware first before attaching the fabric or other decorative elements.
You’ll also need hot glue for quick bonding of fabric or decorative trim, straight pins to hold fabric in place temporarily, and a ruler with a T-square to ensure precise cuts and angles. When measuring your window, add 3 inches to each side of your window width to allow for standard rod placement and an elegant overhang, but for the valance itself, multiply the measured width by 1.5 to achieve proper fullness.

NO SEWING REQUIRED: Skip the sewing machine and confusing patterns. This patented traceable form lets you transform any fabric into perfectly shaped arched valances in minutes - so you can transform your windows with a designer look in just one afternoon.

Blank finish: the wood trim for crafts comes with a sandable and paintable surface, so users can easily adjust color and finish to match picture frame trim wood or kitchen cabinet wooden trim styles,craft wooden fan frame,decorative wood trim for furniture

Distinctive wood texture: crafted from wood, these decorative wood trims highlight natural grain, delivering a refined and warm look to various household or frame sides wooden trim ideas,door trim decor,wood edge trim decorative
3 No-Sew Valance Ideas Under 30 Minutes
You can complete a no-sew valance in under 30 minutes by choosing the right fabric and using simple techniques. Start with a medium-weight cotton fabric, which is easy to handle and cut. For the Heat-Bond Hemming Method, cut your fabric 4 to 8 inches wider than your window to allow for proper coverage and a neat finish. Fold the raw edge twice and insert bonding tape between the folds. Use an iron to press for about 10 seconds, creating a permanent hem without sewing. For a similar effect, use Dritz stitch witchery to bond fabric pieces by melting the tape with an iron, holding it for 10 seconds per side.
Alternatively, try the Board-Wrap Staple Technique: cut a board to the width of your window plus 2 inches. Wrap the fabric around it like a present, then staple the top edge to secure. Pre-drill holes along the board for drywall screws, making installation smoother and avoiding splitting the wood.
Another quick option is the Hot Glue Fold and Attach Style. Apply hot glue along the fabric edge, fold over about one inch to hide the raw edge, and press firmly. Create accordion-style pleats by folding the fabric at regular intervals, then glue corner flaps at a 45-degree angle to hold the pleats in place.
To keep your valance looking fresh, dust it weekly with a lint roller. These methods require minimal tools and can be completed in less than half an hour, perfect for quick updates or last-minute projects.

Use for #1 1/2 Ribbon, light to medium weight Lace, Trim - NOT for hem

1 roll of Iron-on, double-sided adhesive for easily and permanently hemming garments and home décor without any sewing

Iron required, requires heat to activate!
Sew a Simple Rod Pocket Valance
To sew a simple rod pocket valance, start by cutting your main fabric. Add 4 inches to your desired width for seam allowances and hems, and 12 inches to the height. For the lining, subtract 3 inches from that length to ensure it fits inside neatly. After trimming the selvedges, stitch the widths of the fabric together using a ½-inch seam allowance to create a continuous piece. This method uses a double fold hem of 1 inch on each side for a clean finish.
Next, focus on forming the rod pocket. Fold the top edge down 3 inches and press it flat. Fold it over another 3 inches and press again to create a double fold. Sew ¼ inch from the bottom crease of this fold to secure the pocket. This creates a 2-inch deep rod pocket with a 1-inch header above it, giving enough room for the rod and a tidy header.
For the side hems, double fold each edge 1 inch, press, and sew ¾ inch from the edge to secure. The bottom hem involves folding up 3 inches, pressing, and sewing ¼ inch from the crease for a clean finish. To attach the lining, place it face up on the main fabric’s good side, aligning edges. Sew along the bottom and one side, then press the raw edges for a crisp look. Hang the valance to check the length, making sure it’s even before finishing the final hem.

DIY NO-SEW VALANCE MAKING KIT — NOT FINISHED VALANCES: Create custom-fitted architectural rod-pocket valances from your own fabric using two reusable fabric-shaping forms—Contour Arched and Crown Straight. Fabric is not included.

WIDE POCKET DESIGN WITH DURABLE METAL SUPPORT: 2.5 inch pocket fits wide pocket drapery securely, while adjustable 3.44"–5.94" projection allows flexible spacing and sturdy metal construction ensures reliable support.

DIY NO-SEW VALANCE MAKING KIT — NOT A FINISHED VALANCE: Create custom-fitted traditional scalloped rod-pocket valances from your own fabric using the reusable Classic Scalloped TraceShaper fabric-shaping form. Fabric is not included.
Easy Pleated Valances That Look Custom-Made
To create an easy, pleated valance that looks custom-made, start by adding 3½ inches of fabric length for every 20-inch valance depth to ensure sufficient fullness. When making box pleats, fold each pleat so that it consumes about 8 inches of total width, with 2-inch pleats on each side of the center fold. Careful measurement of each pleat is essential; mark and fold precisely to achieve uniformity. Be sure to sew lining 1 inch shorter than the finished length to ensure a proper fit and clean underside. When choosing your materials, remember that a lamp can also influence the style and function of the room.
Use medium-weight cotton or linen fabric to help the pleats hold their crisp shape over time. Sew a straight ¼-inch seam across the entire width of the fabric, securing each pleat about 6 inches from the top edge. Before turning the valance inside out, trim the corners above the hem to reduce bulk and ensure a neat, professional finish.
This method allows you to achieve a polished, tailored look without complex pattern drafting. With accurate folding and sewing, you’ll produce a custom appearance using simple steps and precise measurements.

Package Includes: You will receive a 63-inch wide and 2-yard (1.8m) long muslin fabric; the suitable size design provides plenty of material for your sewing and creative projects; Note: order QTY more than 1, receive several separate packs

Natural fiber blend: Crafted with 60% linen and 40% cotton, this fabric offers the perfect balance of linen's characteristic texture and cotton's softness. The natural fibers provide excellent breathability, making it ideal for home textiles

CONTENTS AND MEASUREMENT: 100% cotton and 63" wide Muslin fabrics, This fabric has a smooth finish, with a soft touch. It also has a natural light drape and stiffness, thanks to its cotton content. ( when order QTY= 2, means you will receive 2 separate pack)
Measure and Mount Your Valance the Easy Way
To measure and mount your valance accurately, start by choosing between an outside or inside mount, as this determines your coverage area. For an outside mount, add 2 to 3 inches to your window measurement to cover the molding and ensure a 2.5-inch overlap on each side. Use a metal tape to measure the width at the top, middle, and bottom of the window, then select the narrowest measurement. For height, measure from the top to the bottom at the left, center, and right, and choose the longest length. Begin the valance at least 3 inches above the window frame to allow space for hardware placement. Always measure every window individually, as each is unique, to ensure the best fit. For best results, consider using LED strip lights behind the valance to create a warm ambient glow.
For an inside mount, measure the window’s depth at three points—left, center, and right. Use the smallest depth to ensure brackets fit properly, especially if the window has cranks or handles that could interfere. Do not round measurements; record them as width by height. Securely mount the brackets according to your measurements, then, with a helper, hang your valance, removing the rod if it has a pocket style. Precise measuring makes the mounting process straightforward and helps avoid adjustments after installation. If you plan to pair the valance with window treatments, be sure to account for the extra depth needed for cordless blinds behind the valance.

Note:Make sure it fits your blind – check size/shape in images and compare with your brackets.

Size: Approx. 1.75 inch in height and 2.5 inch in width. COMPATIBILITY WARNING: Please measure your existing blinds before ordering.

Innovative Design: Introducing the ultimate solution for hanging curtains over vertical blinds - the NoNo Bracket. Designed to attach directly to your existing vertical blind headrail, this bracket simplifies the process of adding curtains to any room.
Common Mistakes That Ruin a DIY Valance (And How to Fix Them)
To avoid common mistakes that can ruin your DIY valance, focus on the width. You need 2 to 3.5 times the window width for gathered styles, so it looks full and proportionate. Skimping on this dimension makes the valance look skimpy and undersized. When mounting your rod, install it 4 to 6 inches above the window frame. This extra height creates the illusion of taller, more elegant windows. Achieving this full and proportionate look requires ensuring your fabric width is at least twice the window width, as recommended for proper fullness. For a similar balanced appearance in fabric roller blinds, the process begins with dusting before any wet cleaning to avoid grinding dirt into the material. For choosing the best materials, refer to a quality and value review when selecting your fabric and rod.
Reinforce your hardware by adding a center support bracket for rods over 5 feet long. Without it, the rod can sag or buckle under the fabric’s tension. Use a sturdy, weight-appropriate rod to prevent bending or warping, especially with heavier fabrics. Lastly, scale your valance’s length to about one-sixth to one-quarter of the window height. A valance that’s too short will look skimpy, while one that’s too long can overwhelm the window. Press all seams flat and fold side edges about 1/4 inch for a clean, finished appearance. Just as Light Up Night in Pittsburgh relies on precise timing, your valance measurements must be accurate for a polished result.