Struggling to keep your closet organized and clutter-free? The good news is, a few simple steps can transform it from chaos to calm.
By sorting your clothes, using the right storage, and maintaining regular tidying, you’ll create a space that’s easy to navigate and looks polished.
Keep reading to discover how you can organize your closet like a pro.
Empty Your Entire Closet: You Can’t Organize What You Can’t See
Emptying your entire closet is the essential first step because you can’t organize what you can’t see. Removing every single item provides immediate clarity about what you own, instead of relying on memory or guesswork. This process reveals hidden garments tucked behind others or buried under piles, making it easier to identify what’s there. Pile everything onto your bed or floor to create a visual deadline; you won’t want to sleep among the chaos. This action also helps release the subconscious scarcity mindset that causes clinginess to clothes for security. As you empty the closet, remove all hangers too, leaving a blank slate. This step allows you to dust shelves and vacuum corners before anything returns. Clearing a clean staging area in advance helps prevent a chaotic reorganization. Don’t forget to gather items from other rooms, including off-season clothing and accessories, for a complete inventory. This exhaustive approach sets a solid foundation for effective, lasting organization. Consider how hanging your curtains with a similar methodical approach can transform a room’s appearance. Just as with LED bulbs, flickering issues in your lighting can often be traced to incompatible dimmer switches rather than the bulbs themselves. When deciding how to furnish your newly cleared space, think about whether a vanity or desk best suits your daily routine.
Declutter Painlessly With This Sorting Method
Once your closet is empty, use a four-pile sorting system to decide what stays and what goes. Label four piles as Love, Maybe, Donate, and Trash. Start by holding each item and asking yourself if it fits well and if you wear it often. Items you love and wear frequently go in the Love pile. Pieces that no longer match your body or lifestyle belong in the Donate pile. Any damaged or broken items go to Trash. The Maybe pile is for items you’re unsure about—you can try them on later to see if you’d buy them today. This method creates a clear hierarchy and makes the decision process straightforward. To reinforce your new habits, consider how hanging a curtain rod requires careful measurement and placement, just like finishing your closet with proper storage. As a final check, apply the 6-month rule to any remaining maybes: if you haven’t worn it in half a year, it should be released from your closet.
Package Unworn Clothes for Donation or Resale
To pack unworn clothes for donation or resale, start by sorting them into three piles: donate, repurpose, and recycle. Check each item carefully—look for large holes, stains, or broken zippers and set aside any damaged pieces. Wash all clothing with unscented detergent and make sure they are completely dry to prevent mildew. Iron any wrinkled items to give them a neat, presentable appearance. For instance, using a closet wire shelf can help you organize the sorted piles as you work. Ensuring your clothes are properly handled and dust-free before packing is as important as the cleaning process for fabric roller blinds.
Next, focus on packaging techniques. Always use clean bags or sturdy boxes, avoiding garbage bags which can cause confusion or suggest improper disposal. Fold the clothes neatly by type and gender. For example, stack T-shirts together and separate men’s from women’s clothing. Label each package clearly, such as “Men’s Shirts” or “Women’s Size M–L,” to streamline sorting at the receiving end. When preparing for donation, seal the bags loosely so staff can easily access and inspect the contents. Place delicate or fragile items on top to prevent crushing during transit. For sweaters that you plan to hang before donation, use a folding technique to prevent stretching and keep their shape. Keep specialty items like formal gowns separate and clearly marked. Before dropping off, verify the charity’s current needs online to ensure your clothing match their requirements. Proper preparation ensures your clothes reach new owners efficiently and in good condition.
Store Seasonal and Sentimental Items Without Losing Space
To store seasonal and sentimental items without losing space, select strategic locations like luggage, under-bed bins, or narrow wall spaces behind curtain rods. Use hidden storage by placing out-of-season clothes inside empty suitcases or draping fabric over totes to hide their contents. Seasonal categorization helps keep things organized—group Christmas items in one clear bin, Halloween in another—and label each container clearly. Stack boxes inside a faux curtain wall or behind furniture to keep clutter out of sight. Keep sentimental keepsakes you can’t part with in separate under-bed tubs, ensuring they remain distinct from seasonal gear. Raising your bed with risers creates extra space underneath for storage bins, which is especially useful for less frequently accessed categories stored in top closet corners. Always opt for clear, stackable bins so you can easily identify contents at a glance, saving time and avoiding the hassle of searching for specific items like that elusive Thanksgiving tablecloth. For windows that lack frame depth, outside mount roman shades offer a practical hidden storage location behind the curtain rod. For nighttime access, a night light can help you quickly locate bins without waking others. A DIY dragon night light could also serve as a fun, customizable glow to guide you toward hidden storage areas.

80L Expandable Larger Capacity : Under the bed storage with dimensions 31.5 x 15.75 x 9.45 inches (with wheels), height adjustable from 9.45" to 11.02" to fit most bed frames. Perfect for storing clothing, shoe, bedding, pillow, towel, and seasonal decor like wrapping paper, Christmas and Halloween supplies. Slides smoothly under bed, couch, closet and table to maximize unused space

Premium Material : The under bed storage containers are made from high-quality, odorless, three-ply composite non-woven thick fabric, foldable and breathable, keep clothing fresh from long-term storage. NO cardboard NOR metal supports insert, arrive to you collapsed and packaged in a clear storage bag.

DIMENSIONS: 28.5"L X 18.06"W X 5.75"H (Inside:25.25"L X 15.25"W X 5.75"H). Perfectly sized underbed storage. Great for holding clothes, blankets, towels, sheets or even your extra pillows.
Measure Your Space and Spot Wasted Potential
To measure your space accurately, start by taking wall measurements at three heights: bottom, middle, and top. Use the shortest of these dimensions for your design to account for any irregularities in the wall. Record each measurement to the nearest 1/16th inch, beginning just above the baseboard to exclude it from your usable space. For depth, ensure at least 24 inches for hanging clothes comfortably; 22 inches is the minimum for standard hangers without crushing garments. Reserve 85 inches of vertical space for double rods, positioning the top rod at 84 inches or lower to allow easy access. Additionally, measure each wall twice at different heights to check for irregularities or distortions, ensuring consistent accuracy. When planning storage, remember that a 27 gallon storage bin typically measures around 24 inches long by 18 inches wide by 16 inches tall, so verify your shelves can accommodate these dimensions.
Next, identify wasted potential by analyzing obstructions. Document the locations of baseboard molding, door tracks, and hinges on your sketch—these do not count as available space. Exclude hardware like handles or brackets from usable measurements. Check whether your walk-in closet has enough room for drawers to open fully without obstruction. To maximize storage, push one rod into a corner, freeing up more space for additional hanging or shelving. By carefully accounting for all obstacles, you will uncover hidden storage potential in your closet.
Hang First, Fold Second: Use Matching Hangers
Matching hangers create a streamlined look and optimize space by keeping consistent gaps between garments. When you use uniform hangers, you eliminate visual clutter and make it easier to locate items quickly, saving you time searching through mismatched shapes and sizes. Additionally, the even spacing prevents clothes from slipping off or bunching up, maintaining a tidy appearance. For a similarly clean and uniform lighting effect, choosing LED light bulbs can reduce energy waste while providing consistent illumination in your closet. Many people wake up more refreshed after using a gradual light progression that mimics a natural sunrise.
Choose hanger materials wisely to suit different clothing types. Thin metal hangers are ideal for lightweight shirts because they take up minimal space and won’t add bulk. However, avoid using them on knits, as they can cause shoulder bumps. Wooden or thick plastic hangers provide sturdy support for heavy coats and wool sweaters, ensuring they retain their shape without bending or stretching. For delicate fabrics like silk, padded or felt-lined hangers prevent snags and stretching, protecting fragile fibers. For long dresses and jumpsuits, attach a clippy hanger at the bottom to prevent dragging and maintain neat vertical storage. Concentrating on a single hanger style simplifies your routine, making it easier to maintain a clean, organized closet. For a dramatic visual upgrade, consider adding low-voltage strip lighting along the top shelf to illuminate your garments and enhance the streamlined look.

INCLUDES: 30 suit clothes hangers in Ivory/Silver for keeping shirts, blazers, slacks, and more neatly hung and organized
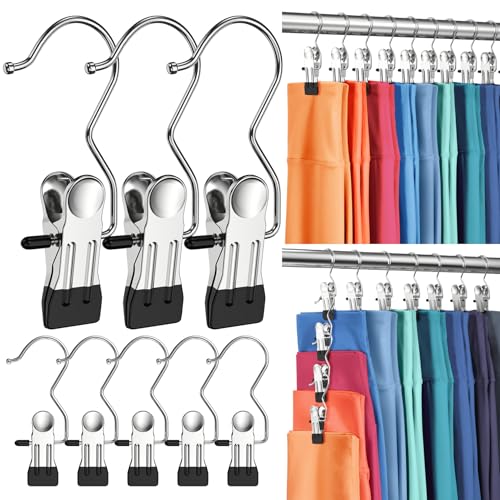
Upgrade Your Closet Organization with Our Separate Clips Hangers: These multi-functional pants hangers with clips are designed to maximize storage while keeping your wardrobe neat and easily accessible. Ideal for holding leggings, yoga pants, jeans, shorts, skirts and more. This legging organizer is perfect for small closets, dorm rooms, or anyone seeking efficient closet organization

PROTECTIVE CURVED DESIGN: The wide, contoured saddle shape supports bag straps along their natural curve, preventing creases or permanent indentations caused by thin hooks or crowded shelf storage.
Organize by Category, Then by Color for a Boutique Look
Organizing your wardrobe by category then by color creates a polished, boutique-style look. Start by separating hanging items from folded pieces to keep the structure clean. Within each category—such as tops, pants, or dresses—arrange the garments in rainbow order: red, orange, yellow, green, blue, indigo, violet. This color system makes it quick and effortless to find the perfect piece. Group neutral tones like black, white, and gray at the end of each section to streamline your search further. Keep delicate fabrics like silks separate from heavier materials such as denim to preserve their condition. Before organizing, purge items that are worn out or no longer fit. Keep only the pieces you love and wear frequently, then arrange the remaining clothing methodically to transform chaos into a sleek, professional-looking closet. Employing step-by-step instructions will help you avoid common mistakes and achieve a flawless result. For a truly cohesive look, ensure your standard sizes of folded items and hangers match the dimensions of your shelving and hanging rods. Choosing top closet wire shelves can provide a durable and adjustable foundation for this organized system.

Enhanced Load-Bearing Capacity: The shelves are more densely arranged, which increases the load-bearing capacity, and the smaller gaps are more suitable for the storage of items

5 shelf wire rack offers handy storage space and easy access to tools and supplies
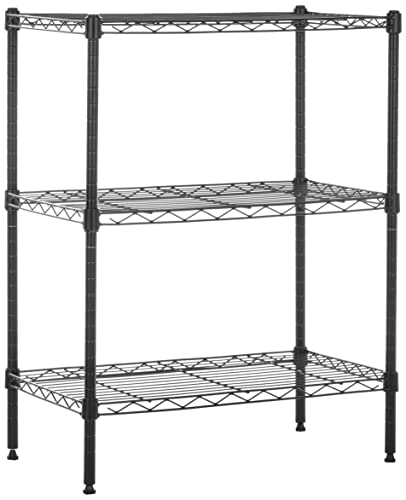
3 shelf wire rack offers handy storage space and easy access to tools and supplies
Organize Your Accessories: Shoes, Belts, and Jewelry Without Clutter
To organize your accessories efficiently, start by gathering all belts, scarves, ties, and jewelry to see their total volume. Discard any broken or unworn items from the past year, and donate duplicates you don’t need. Keeping only what you actually wear makes dressing quicker and simpler, reducing clutter. This process helps overcome the “just in case” mentality by focusing on current wardrobe needs. For larger accessory collections, a dresser may offer better storage capacity than a chest of drawers due to its longer, wider drawers.
Use vertical storage solutions to maximize space. Hang belts and scarves on wall hooks or a dedicated belt hanger. Roll ties and display them on shower hooks for a practical and accessible accessory display. For jewelry, install wall-mounted command hooks to hang necklaces and prevent tangling. Store bracelets and earrings in drawer organizers to keep small items separated and easy to find. Consider whether a toy box vs. organizer better suits your child’s room to apply similar storage principles.
For shoes, place all pairs on open shelving at the bottom of your closet. This way, you can see every pair at a glance, unlike in boxes that hide your inventory. This method keeps your footwear accessible and neatly stored, avoiding clutter buildup. To further enhance visibility, you can install soldered LED strip lights under the shelving to illuminate each pair.

Package Includes: This product contains two tie rack wall mounted. Each tie organizer has 20 hooks, allowing for more ties or belts to be held. We also include 3 packs of screws, each pack containing 2 screws and 2 expansion tubes, there are also 4 nanopatch you don't need to purchase any additional accessories

Efficient Tie Organizer for Men: Our wall-mounted tie rack features 20 rotating hooks, perfect for hanging ties, belts, purse, and other small items. It's an ideal choice for men!
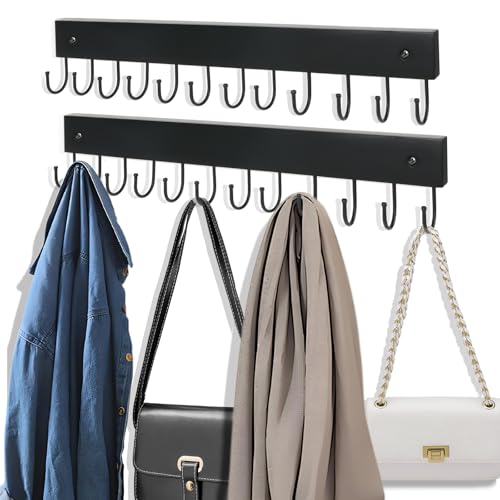
Practical and Efficient Purse Organizer Hanger for Wall: Looking for a practical and efficient Purse hangers for wall? Hanger for handbag? hanger for backpack? Want to make sure that your expensive handbag doesn't crease or wrinkle? AnDocK purse hangers could meet your needs and will keep your entire handbag organizer clearly visible and neatly organised
A Weekly 10-Minute Reset That Keeps Your Closet Magazine-Ready
A weekly 10-minute reset keeps your closet magazine-ready and manageable. To do this, set a timer for ten minutes on a consistent day each week—Sunday evening works well for many. Begin with a quick floor sweep: remove stray garments, put soiled items in the hamper, and hang clean clothes immediately to prevent clutter. Use a collection basket to gather misplaced clothing from other rooms and return each item to its designated spot.
Next, select your outfit for tomorrow and hang it on a valet hook for easy access. Keep your top five most-worn items front and center, so they’re readily available. Refold any toppled T-shirt stacks, and turn all hangers to face the same direction to instantly create a tidy look. Wipe down shelves and mirrors, and check your closet lighting to ensure it highlights your space effectively. Use hanger labels to categorize items quickly during the reset. Finish by glancing over the space to spot anything out of place. Ten minutes, once a week, and your closet stays magazine-ready.
Adopt the One-In-One-Out Rule to Prevent Relapse
Implement the One-In-One-Out Rule to prevent relapse into clutter. For every new item you add to your closet, remove one existing piece. This creates a sustainable balance, making you pause before each purchase to ask, “What will I let go of?” Such a question prioritizes quality over quantity and discourages unchecked accumulation.
Start by selecting a specific item to discard before bringing in a new one. Keep an “outbox” for items you’re hesitant to part with, but set a firm deadline—such as one month—for donation or disposal. If space is limited, consider adopting a two-out, one-in ratio to maintain strict control. Tracking your releases over time reinforces your progress and highlights your commitment to a clutter-free space.
Applying this rule consistently helps establish long-term habits. It makes you mindful of your belongings and reduces the chance of slipping back into clutter, ensuring your closet stays balanced and organized over time.

Unique Trapezoid Design: Our closet bins feature a unique trapezoid design with a lower front for easier visibility and access. The Homsorout shelf organizers now come in 10 new colours, offering more options for your space

Product Size: To ensure a perfect fit for your wardrobe, please pay close attention to the product dimensions before making a purchase. Each storage box layer measures 16.73 inches in length, 13.11 inches in width, and 7.28 inches in height (equivalent to 42.5 cm x 33.3 cm x 18.5 cm). Double-checking these measurements will help you avoid any compatibility issues.

【Larger Dimension】The gray fabric storage container measures 15.7*10.6*8.3 inches, can helps solve your daily storage issues. AARAINBOW's decorative fabric storage baskets can be used as closet clothes organizer, toy storage bins, magazine and book organizer, nursery boxes, laundry basket.