Ever wonder how to convert a standard ceiling light to a pendant fixture? The process is straightforward, involving turning off the power, removing old hardware, and installing a conversion adapter to suspend your new pendant.
By the end, you’ll have a stylish upgrade that’s both functional and attractive. Keep reading for step-by-step instructions to help you do it safely and easily.
Turn Off Power and Verify With a Voltage Tester
To safely turn off power and verify with a voltage tester, start by locating your electrical panel and flipping the correct breaker to OFF. Use the panel’s label or numbering system to identify the appropriate switch. Do not rely solely on the switch; complete disconnection at the panel is necessary for safety. Next, grab your voltage tester and ensure it functions correctly by testing it on a known live source. The panel’s side may have numbered circuits that align with specific areas or appliances, helping you target the correct breaker. If your drop ceiling uses can light fixtures, confirm that the breaker corresponds to the ceiling grid layout to avoid confusion. For a budget-friendly DIY approach, similar principles apply when building a lava lamp from simple household materials. Choosing between a vanity or desk for a workspace involves similar considerations of functionality and available space.
Approach the electrical box and perform a non-contact voltage test near each wire and terminal. This helps detect any stray or residual voltage without making contact. Follow up with a contact tester on the hot and neutral screws, and between the hot and ground wires. Testing all wires in the box ensures you do not miss any live current hiding in unexpected places. If the tester shows no indicator or reads zero volts, it indicates the circuit is de-energized and safe to work on.
After confirming the circuit is off, always re-test the power source to verify your tester still functions properly. This extra step safeguards against faulty tools that may give false readings, providing confidence that the circuit truly is safe.
Remove the Old Trim, Bulb, and Hardware Cleanly
To remove the old trim, bulb, and hardware cleanly, start by gripping the trim ring with both hands and pulling straight down 2 to 3 inches. This releases the spring resistance. Next, squeeze any V-shaped torsion springs or coiled spring clips together to detach the trim from the housing. If the trim sticks, rotate it slightly or use a putty knife to gently loosen stubborn clips. Consider using inexpensive lumber as a stabilizing brace when working near the ceiling opening. This method is similar to softening adhesive with heat or a solvent before prying off old window film. For a stable work surface, use a picture hanger as a temporary support for the fixture while you disconnect the wiring.
Unscrew the bulb, and if gripping is difficult, use a suction cup to handle it safely. Remove the socket clips and gently extract the socket, inspecting for damage or corrosion. For fixture disassembly, locate and remove screws, clips, or friction tabs that secure the can to the mounting bar. Push the can upward and then angle it out of the ceiling opening.
Squeeze the side spring clips to detach the housing from the ceiling. If necessary, disconnect the fixture from the junction box. Throughout this process, apply steady pressure to avoid cracking the drywall. Ensure the trim is fully detached before maneuvering the housing to prevent debris from falling or causing damage. This upgrade eliminates dust and spider webs often found in attic spaces around old trims.
Install the Conversion Adapter and Mounting Bracket
Start by preparing the mounting bracket assembly. Combine the three offset-sliding brackets with the main mounting bracket using flat-head screws and wing nuts. Tighten them securely until the assembly feels stable. Next, position the adapter inside the can housing. Locate the metal bracket that holds the socket; if it’s adjustable, loosen the wing nut to slide it upward, then tighten it firmly. Screw the CAN CONVERTER power outlet adapter directly into the prepared socket, ensuring it is fully seated and secure. During this step, ensure the pigtail wiring is properly attached to the socket to supply power to the new fixture. Similar to how fabric pleats are evenly spaced for a balanced curtain, verify the adapter is centered before tightening. This careful centering is crucial because ambient light from the fixture must be distributed evenly across the room to avoid harsh shadows and dark corners. If the adapter is not fully seated, it can cause LED bulb flickering due to poor electrical contact.
Run the wires through the threaded pipe before screwing it into the mounting bracket. Screw the pipe firmly into place. Place the medallion at the can light opening against the pipe, then screw the pipe upward so it extends beyond the medallion by about a quarter of an inch. Thread a nut onto the pipe up to the mounting bracket and tighten it securely. Finally, screw the mounting plate onto the pipe, thread the second nut through the wires, and tighten it to lock the mounting plate in place.

Unique patented design enables you to transform existing recessed lighting into a pendant or other light fixture. They are easy to use

Convert Recessed Lights with Ease: This all-in-one kit lets you transform standard 6-inch recessed can lights into pendant or ceiling fan fixtures—ideal for lighting upgrades without major renovation.
Connect the Pendant Wires to the Can Housing Wires
Turn off the power at the breaker and verify zero current with a non-contact voltage tester before working on the wires. Strip ¾ inch of insulation from both the pendant and can housing wires using wire strippers. Carefully match the wire colors: connect the black (hot) wire from the pendant to the black wire in the can housing, white (neutral) to white, and the ground (green or bare copper) to the grounding terminal. Twist each connection clockwise, then secure with appropriately sized wire nuts for 18–14 AWG wires. Ensure no bare copper is exposed beyond the wire nut after twisting. Keep the ground wires separate from the hot and neutral connections, and tuck all the wires neatly into the canopy. Gently tug each wire after connecting to confirm a secure hold before proceeding. Westinghouse includes a patented brace and instruction sheet to help secure the assembly inside the can during this wiring process.
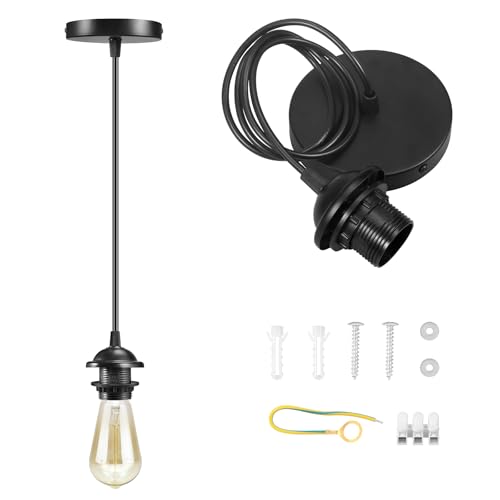
1. DIY PENDANT LIGHT KIT: Vintage hanging light kit with E26/E27 socket, perfect for your DIY home decor lighting, simple and portable

UL Certified & Sturdy: Crafted from premium PVC, Zarnicy pendant light cord is durable, heat, and corrosion resistance for long-lasting use. Rest assured of this pendant light kit that is UL certified; Please avoid using bulbs over 60W to prevent overheating

Copper Socket - JACKYLED Industrial pendant light kit use premium copper for socket to present vintage style which makes it a perfect decor for your kitchen,bedroom, living room, corridor, coffee shop, office etc.
Adjust the Cord Length and Secure Strain Relief
To adjust the cord length and secure strain relief properly, start by measuring the distance from the ceiling to your desired hanging position, including the canopy height and the deepness of the recessed light housing. Make sure the power at the breaker is turned off before proceeding. For safety, follow the same circuit isolation steps used when installing a dimmer switch. Locate the cord vice or set screw and loosen it just enough to allow the cord to slide freely. Pull the cord until it reaches your target length, then tighten the screw firmly without crushing or damaging the wire. Always read the instructions that come with the light kit before beginning for proper preparation. Clean the surface of the recessed housing with a lint-free cloth and mild detergent to ensure adhesive compatibility when securing components. Next, manage the excess cable by wrapping it around the spindle bracket or tucking it fully into the recessed housing. Slide the canopy up to the ceiling and apply strain relief by tightening the compression nut. Gently pull downward on the cord to flex the spring arm, ensuring the canopy sits flush against the ceiling. Finger-tighten the nut securely to prevent slippage. Proper cord management and strain relief are essential to prevent future damage and to maintain a clean, professional appearance for your pendant. Use budget-friendly materials similar to those used for DIY curtain rod brackets to save on installation costs without sacrificing durability.

Package Including: You will receive 50 Pairs Light Socket Grip Strain Relief. These Cable Glands Are Standard M10 Cable Glands That Can Be Screwed into the Base of Any Standard Lamp Socket, Not Easily Loosened or Rotated After Tightening.

50pk Black plastic Strain Relief with 1/8ips Female Thread

Package Including: You will receive 50 Pairs Light Socket Grip Strain Relief. These Cable Glands Are Standard M10 Cable Glands That Can Be Screwed into the Base of Any Standard Lamp Socket, Not Easily Loosened or Rotated After Tightening.
Assemble the Pendant Shade and Restore Power
Once you’ve adjusted the cord length, slide the bulb socket base onto the white bulb socket and tighten it securely. Then, connect the brass rod to the top of the socket assembly to complete the main structure. For the shade assembly, slide the clear glass shade over the rod and socket, then thread the retaining ring onto the socket bottom inside the glass to hold it firmly. Secure the outer fastener to the inner “C” piece, aligning and tightening both connection points.
Next, install the shade onto the fixture by positioning it over the socket, adding the spacer tube and brass ring. Thread the ring onto the socket nut to seat the shade correctly. For electrical connections, connect the bare copper ground wire to the ground lead using the pre-looped wire. Use wire nuts to join the light leads to the power lines. Turn off the breaker to the room before starting any wiring work. Tuck all wires neatly into the electrical box, then attach the fixture with cap nuts. A common source of flickering issues can be traced back to loose wiring connections. Finally, restore power by turning the circuit breaker back on. For a similar mechanism, ensure that cord tension is properly balanced to avoid strain on internal components. Choosing a fixture with a high-quality build can significantly reduce long-term performance problems.
Troubleshoot Common Problems: Flickering, No Power, or Sagging
Flickering after installation can often be fixed by checking a few key components. First, ensure the compression nut is tightened until resistance is felt, which secures the canopy against the ceiling. If it’s loose, the fixture may wobble, causing the bulb to flicker. Make sure the cord is wrapped tightly around the spindle arm to prevent slippage that could disrupt electrical contact. Inspect all wire connections for loose twists or poor contact points—tighten any that appear loose. Test the bulb and switch to see if flickering persists, as faulty bulbs or switches can also cause this issue. Consistent power flow is essential for stable lighting, so addressing these areas should resolve flickering problems. The kit’s design depends on a socket adapter screwing into the existing light bulb socket location to ensure stable electrical contact. Taking precise measurements of the ceiling fixture positioning can also help confirm alignment is correct. Ensuring proper contact is especially critical when using a three-way dimmer switch that relies on stable load connections. For a sturdier setup, consider using a DIY bedside table as your work surface to keep components organized and free from movement.
If your light has no power, start by confirming the breaker is on and the wall switch is activated. If the breaker has tripped, reset it and test the fixture again. Check that the green ground wire is properly connected to the ground terminal and that the socket adapter is fully seated in the socket. A loose connection here can prevent power from reaching the bulb. Finally, replace the bulb with a new one to rule out a faulty filament or electrical defect.
Sagging canopy is usually caused by a loose compression nut or excess cord hanging below the fixture. To fix it, loosen the compression nut, gently flex the spindle arm to align the canopy properly, and slide it tight against the ceiling. Hold the canopy in position while re-tightening the nut securely. To prevent future sagging, wrap any excess cord around the spindle bracket and secure it with a tie wrap. This helps keep the fixture centered and prevents strain on the wiring, ensuring a clean and professional appearance.