Struggling to find enough storage space at home? Building a custom storage bin rack can save you 40 to 60 percent compared to store-bought shelves and fit perfectly into your area.
By using simple materials like 2x4s and standard tote spacing, you can create a sturdy, mobile, and safe solution tailored to your needs.
Keep reading for all the details to get started.
Why You Should Build Your Own Storage Bin Rack
Building your own storage bin rack can save you 40–60 percent compared to purchasing pre-made shelving. This approach allows you to customize the design to match your garage or closet, whether by using reclaimed wood or applying paint for a cohesive look. You can also incorporate lighting by attaching LED strips under the shelves, providing clear visibility without clutter. Because the open-rail structure displays labels instantly, you save time searching for items. Opting for DIY construction helps you avoid markup fees, potentially saving 100 to 200 dollars per unit. Using deck screws ensures the structure won’t split over time, offering long-term durability. This method gives you control over bin sizes and rack stability, resulting in a storage solution that is both functional and visually appealing. To further enhance organization, you can build a slide-in rack with individual compartments for each tote to prevent stacking issues. When planning your layout, consider whether a vanity or desk would better serve the space if you later convert the area for home office use. For additional design inspiration, consider how curtain rod types can similarly support weight while adding a polished finish to your room. If you integrate LED strip lighting, ensure you address poor electrical connections to prevent flickering and maintain consistent illumination.
Measure Your Space for a Storage Bin Rack Layout
Measure your wall and floor dimensions carefully before building. Record the length of each wall from floor to ceiling, taking measurements from skirting to skirting if your room has baseboards. Leave a gap of 1 to 2 centimeters between the rack and the wall to allow for expansion and easy fitting. Next, determine the size of your storage bins by measuring their widest point, usually at the lid, to ensure proper spacing between the vertical supports. For standard bins, set the vertical spacing at 20.5 inches, which provides enough room for easy access and removal. For optimal visibility of stored items, consider incorporating a night light into your rack design to improve low-light accessibility. Use a tote storage configurator tool to generate a custom build plan based on your bin dimensions for accurate cut lists and screw quantities. Calculate the overall length of your rack by multiplying 22 inches by the number of bin columns, then add 1.5 inches for extra clearance. Choose a consistent depth of 30 inches for the rack to maintain uniformity and stability. A 27 gallon storage bin typically measures around 30 inches long, 20 inches wide, and 15 inches deep, which aligns with the spacing and depth recommendations here. When planning color schemes, consider how the visual appearance will integrate with your existing decor. Ventilation is also important, especially if you plan to store items that need airflow; incorporate vented panels or leave gaps near the walls or inside closets for better airflow. To ensure the film adheres smoothly during any future rack surface refinishing, use a squeegee tool to remove air bubbles and wrinkles. Finally, verify your measurements by marking the rack footprint on the floor with painter’s tape. Walk around the setup area to confirm there are clear paths and enough space for assembly and access before proceeding with construction. Taking these steps ensures your rack will fit perfectly and function efficiently in your space.
Materials and Tools You’ll Need for a Storage Bin Rack
To build a sturdy storage bin rack, you’ll need specific materials and tools. Gather 2-by-4 lumber for the vertical supports and beams, as well as 2-by-2 lumber for the bin runners. You can consider using alternative materials such as 3/4-inch plywood for the shelf tops or back panels, depending on your needs. For fastening, drill two pilot holes at each support rail end before driving screws to ensure secure connections. Use 2.5-inch pocket hole screws for frame assembly and add wood glue for added strength. Precise alignment is crucial, so have a speed square, a level, and a framing square on hand. To improve mobility and safety, consider attaching optional casters or furniture straps. Finally, anchor the rack to the wall or floor with two 3-inch screws on each side to prevent tipping. Each support is always 30 in long to ensure consistent spacing and stability across the structure. This same concept of removing the drawer can be applied if you need to access or replace a damaged bin runner.

【 FIT FOR 2x4 LUMBER 】- Each outside metal wood stacker bracket measures 12- ¾ inch length by 3-¾ inch width by 6" depth. The inside 8 holes (3-¾ x 1-¾) well fit to the wood with cross section of 2 x 4 (lumber NOT included), and good ideal for personalized board dimension cutting. This allows you to customize just how big you want your out side log stacking to be.

2MM THICKENED WALL -- Our wood rack for lumber is constructed with a 2mm solid steel material and finished with a powder coating, making it ideal for long-term indoor or outdoor use. It is designed to withstand bending and tipping, ensuring its stability and durability. With these log racks, you can achieve the perfect solution for your wood storage needs while keeping your yard tidy.
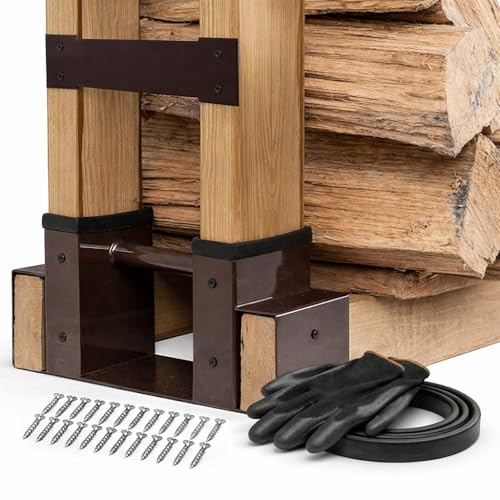
🌲 Tailored to Your Needs, Regardless of Size: Each lumber storage rack includes 2 brackets (13” x 5.7”), 2 steel plates, 60” seal strip, 1 pair of construction gloves, and 25 screws, offering you the flexibility to customize the length that suits YOUR requirements! (Simply provide your own 2x4’s and firewood.)
Build the Main Frames for Your Storage Bin Rack
To build the main frames for your storage bin rack, start by cutting four uprights for a single stack of totes. Add two more for each additional stack. Bundle the uprights flush and use a framing square to transfer 17-inch spacing marks from a guide board. Cut each upright with a miter saw and stop block for accuracy. This ensures the frame is square and the totes will fit properly. This process mirrors the calming, step-by-step precision of a DIY lava lamp project, where careful alignment ensures a successful final result. For a similar approach to tracking measurements, consider using a budget-friendly stop block technique to repeat cuts without error. Using a miter saw with a stop block is also a common method in DIY furniture projects for consistent, repeatable cuts.
Assemble the exterior ladders first by attaching the top and bottom horizontal rails to the uprights. Position the first rail’s top at 15 inches from the ground, then add 2.5 inches to account for final clearance above. Use pilot holes for each connection to prevent splitting and make assembly easier. Before screwing the rails in, square the assembly by measuring diagonal distances to confirm the frame’s squareness. When adding additional columns, remember to cut the bottom and top plates 22 inches wider for each new tote section.
For added stability, cut four 2-foot diagonals at opposing 45-degree angles and nail them into the back of the frame. These braces keep the structure rigid and prevent wobbling over time. Always check all four corners with a framing square to ensure 90-degree angles. Focus on creating a sturdy, perfectly square frame before moving on to adding shelves or decorative touches.

【SECURE & STABLE】 — The Fence Flip Stop locks firmly onto standard T-track with zero wobble, eliminating measurement drift during repetitive cuts. Unlike plastic stops that shift under pressure, this T-Track Flip Stop stays put for flawless table saw and miter saw operations. Perfect for woodworkers tired of re-measuring after every pass.

[Precise Repeatable Cutting] Transform your woodworking fence into a high-efficiency station. This T-track flip stop allows you to lock in exact measurements for consistent, repeated cuts or drills without the hassle of re-measuring, saving time and reducing material waste.

INCLUDES: (2) T-Track Flip Fence Stop (3 inches) with 5/16" T-Bolt
Install Runners and Spacers for a Perfect Tote Fit
To ensure a perfect fit for your totes, install spacers and runners using precisely cut blocks. Start by cutting and labeling your spacer blocks to define the correct rung spacing and rack width. Use 2×4 lumber cut to 10½, 12, 21, and 22 inches, which provide the necessary strength for heavy totes. Lay your assembled ladders on their sides for easier measurement and assembly. For those who prefer a gradual wake-up, consider sunrise alarm clocks as an alternative to bright overhead lights. For a similar privacy effect in your home, consider window film that lets you see out but not in. If you are working in a basement, ensure your can lights are properly recessed to avoid interference with the rack’s placement, following can light drop ceiling guidelines for clearance.
For spacer placement, hold a 29-inch block tightly between the first two ladders. Then, screw through the bottom horizontal rail into the spacer to maintain consistent spacing. Repeat this process for each ladder to keep the width uniform. Next, attach the top horizontal rails using your 21-inch spacer blocks. Work systematically from one end to the other, ensuring each assembly stays snug against the spacers and flush with the outside edges of the rack. Screw uprights to spacer blocks, keeping screws inside to prevent splitting, as this prevents splitting of the wood.
Secure each ladder upright with two screws to properly fasten them in place. This method guarantees a precise fit for your totes, preventing shifting and helping your rack stay square and stable over time.

【 FIT FOR 2x4 LUMBER 】- Each outside metal wood stacker bracket measures 12- ¾ inch length by 3-¾ inch width by 6" depth. The inside 8 holes (3-¾ x 1-¾) well fit to the wood with cross section of 2 x 4 (lumber NOT included), and good ideal for personalized board dimension cutting. This allows you to customize just how big you want your out side log stacking to be.

2MM THICKENED WALL -- Our wood rack for lumber is constructed with a 2mm solid steel material and finished with a powder coating, making it ideal for long-term indoor or outdoor use. It is designed to withstand bending and tipping, ensuring its stability and durability. With these log racks, you can achieve the perfect solution for your wood storage needs while keeping your yard tidy.

Customizes to the fit size - Each wood racks outdoor for firewood is 3.7 "W x 6" H inches. Unlike the traditional firewood holder outside, the depth of our upgraded log bracket can be adjusted to 11.7”, 13.3”, or 14.8”. You can adjust the fit height, width or depth of the firewood storage based on the amount of wood you want to store. Customize your firewood rack storage carrier to fit on large-capacity outdoor or small-capacity indoor.
Modify Runner Spacing for 5 or More Storage Bins
To accommodate five or more storage bins, you need to adjust your runner spacing to handle the added height and weight. Start by measuring your bin dimensions— for 27-gallon totes, that’s approximately 14 ¾ inches tall. Add 1 to 1.5 inches of clearance above each bin for easy sliding. Set your runner spacing on-center to 15–16 inches to prevent snagging and ensure smooth movement. Ensure your rack is built to support hundreds of pounds by using sturdy 2x4s and reinforced joints. For optimal results, apply best practices for cutting and adjusting materials to maintain precise fit. Choosing between incandescent and LED lighting can affect how well you see your work area. Consider the ambient glow of a well-lit workspace to improve visibility during assembly.
For five rows at 15.5 inches each, your total rack height will reach approximately 77.5 inches. Keep in mind the bottom clearance, positioning the lowest runner 9 ¾ inches from the floor. The top runners should sit at around 13 ¼ inches to allow stacking of tote lips. Proper runner spacing directly influences access and vertical space utilization, so follow these measurements closely to avoid clearance issues at the top and waste space below.
Build a Multi-Column Rack for Bigger Spaces
To expand your rack for larger spaces, build a multi-column frame with a clear structure. Start by constructing two main wood frames—front and back—using vertical and horizontal 2x4s. Position the vertical posts 22 inches on-center, ensuring the horizontal components are flush and secure. Add additional columns by spacing them 22 inches apart, maintaining a consistent depth of 30 inches throughout.
To accommodate bins, leave 20.5 inches of clear space between vertical posts. Calculate the total height based on the number of rows, with each row measuring 17 inches plus an extra 4 inches, with the total height being 17 inches times the number of rows plus 4 inches. Use one more vertical piece than the total number of columns to provide stability.
Secure the front and back frames with double top plates that attach to ceiling joists and fasten them firmly to the concrete flooring for stability. Connect the frames using 30-inch rails, checking that the entire assembly is square at each step. When driving screws, stagger them from both sides to prevent twisting. Before securing remaining rails, perform a test fit with your bins to ensure proper fit and spacing. Additionally, employ scrap wood spacers to maintain uniform spacing and alignment during assembly. Use two screws at each connection point to maximize stability and prevent shifting. For even greater safety, consider using cordless blind mechanisms to allow easy access to bins stored on higher rows without straining.
Finally, incorporate color coordination for your bins to simplify organization and add custom labels for easy identification. For a cohesive look, consider matching your bin colors with your chosen kitchen curtains to enhance the overall aesthetic. Properly built, your multi-column rack will maximize storage efficiency in larger spaces while maintaining durability and neatness. However, if lighting inside the rack is needed, LED bulbs provide a cooler, more energy-efficient option than halogen alternatives.

TOUGH AND DURABLE: Engineered polymer molded ABS plastic all-weather brackets stand up to the elements and will not rust, corrode, crack, or peel

WHAT YOU GET -- A pair of firewood log brackets with wood screws, fit for 2x4 universal lumber. (Lumbers are not included).
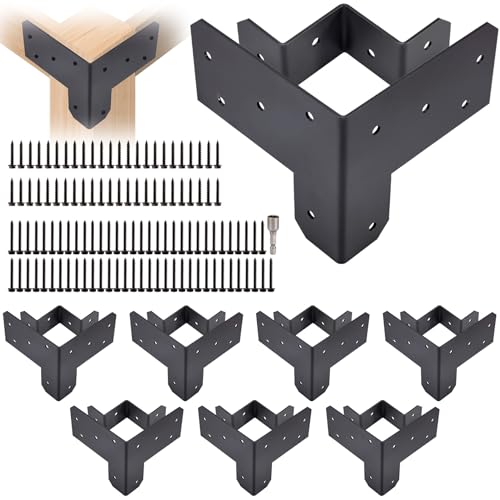
8-Piece 3-WAY Brackets Kit: Comes with 8 heavy-duty 3-way corner brackets, plus 20 4cm screws and 10 3cm screws—everything you need to build a custom wood workbench that fits your space
Add a Back Support Beam and Secure the Rack for Safety
To add a back support beam and secure the rack for safety, begin by selecting the appropriate support beam type and drilling pilot holes for 5-inch lag screws. Measure precisely from the front of the beam to the screw position—usually 2 and 7/8 inches—to ensure accurate placement. Pre-drill on a workbench or directly on-site by measuring to the joist, and mark the ceiling line in front of the joist for precise lag screw alignment. Secure the beam to the wall and ceiling using the lag screws, maintaining consistent measurements from the front and back lines for every support unit. This uniform spacing is critical for ensuring the stability and safety of the rack, and ensures each T-shaped support aligned with ceiling joists slides smoothly without binding. For additional stability, ensure the lag screws are driven into closet wire shelves that are already firmly attached to the wall.
In addition to the support beam, attach a sturdy back support beam spanning the length of the rack. Secure it firmly to the wall studs, aligning it level with the top or midsection of the rack to reinforce the structure and prevent twisting. Use at least two screws per connection point to guarantee maximum strength. Ensuring each component is securely fastened minimizes wobbling and enhances overall safety during storage and handling.
Add Casters for a Mobile Storage Bin Rack
Start by choosing 1 1/4-inch roller casters for your mobile storage bin rack. They cost about $3 for a pack of two at stores like Lowe’s and are suitable for handling standard bins. Larger wheels offer better roll over debris and irregular surfaces but verify that the diameter matches your load weight to ensure stability. For maximum durability, select casters with a combined capacity of over 1,400 lbs if your rack will hold heavy totes. For attaching the casters, use 3/8-inch wood screws with one washer per screw for thin slats. If your rack has 2×4 frames, opt for structural screws to prevent splitting. Position each caster 1 1/2 inches from the edge, aligning with the innermost part of the first slat. Mark all four corners carefully, then pre-drill with a 1/16-inch bit to prevent splitting when fastening. Fasten the casters on all four corners for balanced weight distribution. To improve lateral stability, add diagonal blocks to the back. Finally, test the mobility on different floor types—this ensures smooth rolling without tilting or catching.

PACKAGE: Included 4 casters (2'' Diameter Wheel).

These Metal Magery Hardwood Casters are perfect Replacements for original wood casters used on most old American furniture including Hoosier cabinets, kitchen tables, chairs and a variety of other furniture.

PACKAGE: Included 4 Heavy Duty Low Gravity Center Swivel Casters(Free Bolts, Nuts and Washers)
Common Mistakes to Avoid When Building a DIY Bin Rack
Avoid common mistakes when building your DIY bin rack to ensure stability and longevity. Always measure your totes before designing the rack; for example, use a 22-inch center-to-center spacing for ladder supports. Using screws shorter than 2 inches risks joint failure, so opt for at least 2-inch screws. Drive four screws into each support rail instead of just two to reinforce stability. Skipping pilot holes can cause wood splitting—always drill them first. Incorporate a diagonal back support beam to prevent the rack from tipping over, especially when storing heavier totes. Place heavier bins on the bottom row to keep the center of gravity low and improve balance. Always secure your rack to the wall and confirm it is level with a laser level for proper alignment. Choose sturdy materials like solid plywood or 2x4s, rather than flimsy substitutes, to support the weight efficiently. Incorporate gas springs to facilitate raising and lowering the rack for easier access to higher bins. Finally, adding decorative details and matching color schemes can personalize your rack and make it blend seamlessly with your space.