Want to hang mini blinds the right way but unsure where to start? Proper measurement and placement are key to making them look and function well.
When installed correctly, they’ll enhance your space with clean lines and better light control. Keep reading for simple steps to help you install your blinds with confidence.
Measure Your Window for Bracket Placement
To ensure proper bracket placement, you need to take precise measurements at multiple points across your window. Begin by measuring the inside width at the top, middle, and bottom of the frame. Record the narrowest measurement, as this will serve as your baseline for bracket placement. Use a steel tape measure and round all numbers to the nearest ⅛-inch. Never round width measurements up; always round down or keep the same to avoid overestimating the space. This measurement approach is for an inside mount, which installs within the window frame for a clean look. Deciding between storage options like a chest of drawers and dresser can involve similar precision when measuring a custom furniture footprint. Next, measure the height at the left, center, and right sides of the window. Document the longest height measurement to ensure your brackets will cover the entire window. When measuring height, round all numbers up to the nearest ⅛-inch to prevent gaps. For a garage sale setup, you could apply similar precision to build a DIY clothing rack that fits a specific space. When choosing light fixtures for the room, consider how tungsten bulbs versus LEDs differ in cost and style to match your window treatment.
Finally, verify the squareness of your window by measuring diagonally from corner to corner. If the diagonal measurements differ by 12 millimeters or less, your window is square enough for standard mounting. Larger discrepancies indicate the need to adjust your bracket alignment or consider alternative mounting options. Accurate measurements now help prevent installation errors, gaps, or uneven bracket placement later on.
Choose Inside or Outside Mount for Mini Blinds
Choosing between inside and outside mount for mini blinds depends on your window’s shape and your desired look. An inside mount requires at least ¾ inch of unobstructed frame depth to hold the hardware securely. It provides a sleek, built-in appearance that blends seamlessly with the window casing, creating a clean and modern aesthetic. However, avoid inside mounts if cranks, handles, or uneven frames block the opening, as these can interfere with the installation or operation of the blinds. An inside mount is more popular due to aesthetic preference and offers a clean, recessed look.
An outside mount is ideal for shallow or crooked window frames. It involves mounting the blinds outside the frame, overlapping the window by about 2 inches on each side. This approach offers better light control and privacy, as overlapping the window reduces gaps. Additionally, outside mounts can make small windows appear larger by visually expanding the opening. Keep in mind, this option may require extra clearance for furniture or window treatments to prevent bumps. When choosing lighting, compare the classic look of incandescent bulbs with the efficiency of LEDs. Choose the mount style that complements your room’s look and functionality, and ensure top heights are aligned if you plan to install multiple windows with different mounting types. For a successful installation, remember to follow practical DIY tips such as measuring twice to avoid mistakes, much like when connecting LED strip lights. Understanding how LED bulbs work can help you pick matching lighting that enhances the room’s overall decor.
Mark the Bracket Positions Perfectly Level
Mark the bracket positions perfectly level by starting with a high-quality spirit or laser level to draw clear horizontal reference lines. Measure the window width at three different points—top, middle, and bottom—and use the narrowest measurement to ensure the brackets will align properly without sagging. When marking the precise positions for each bracket, keep them spaced no more than 60 inches apart. For vinyl blinds, place brackets 3 to 4 inches in from each headrail end, making sure they’re at least 1/4 inch away from the ends to allow for end caps. For inside mounts, mark on the underside of the frame for accurate placement. Before choosing between a vanity or desk, weigh style, cost, and function to determine the perfect fit for your space. Tilt the blind forward when marking internal components, and mark an “X” on areas where brackets cannot go. Before drilling, double-check all marks with a level to confirm they are perfectly horizontal. Using the level immediately prior to installation ensures the brackets are perfectly level, preventing uneven hanging or mounting errors. A flickering LED bulb can also be caused by incompatible dimmer switches, which often require a simple replacement to resolve the issue. For complete ceiling coverage, consider using can light ceiling installations to integrate recessed lighting above your window treatments.
Drill and Install the Mounting Brackets
After selecting the ideal bracket positions, hold each bracket securely in place and mark the screw hole locations with a pencil. Position two holes diagonally for added stability. Next, use a power drill with a 5/64-inch drill bit to predrill pilot holes, especially when working with wood frames. This prevents splitting and makes inserting screws easier. Align each bracket over its predrilled holes, ensuring the material of the bracket matches the surface for optimal grip. Loosely insert the mounting screws with your drill to allow for small adjustments. Check that the headrail slides smoothly between the brackets. Once satisfied with the alignment, tighten the screws fully at a 90-degree angle to ensure vertical stability. Confirm that the bracket lip does not interfere with the tilt wand mechanism before proceeding. Remember that the oval-shaped holes in the brackets allow for slight adjustment in height, so you can fine-tune the bracket position within that margin. If you are considering alternatives, single and double cell cellular shades offer different insulation and light control properties that may influence your window covering choice. For additional guidance on hanging fixtures, refer to expert advice on securing brackets to various surfaces. This process mirrors the precision needed when creating a DIY jewelry organizer wall, where careful bracket placement ensures stability and functionality.

Helps deliver no walk start and speed with pilot point

Withstands high-temperature applications for extended periods of time (up to 1,100 degreeF)

[5/64 Inch 20PCS] A pack containing 20 pieces 5/64"(Dia 1.984mm) cobalt metal drill bits comes in plastic storage case for easy storage.
Snap the Headrail Into the Brackets
To properly snap the headrail into the brackets, ensure the tilt mechanism faces the room for correct operation. The assembly process is sensitive to alignment; the rear lip of the headrail must catch behind each bracket’s rear leg. Both end mount brackets should sit at the same height to prevent slanting and ensure smooth operation. Start by fitting the front edge into the front hooks, then push the headrail backward while tilting the back upward. The front lip needs to sit over the top lip of the bracket. To snap the brackets into place, gently pull down on the front of the headrail while pushing upward on the back until you hear a firm snap. Avoid trapping the top slat inside during this step. After snapping into place, pull down firmly with both hands to confirm that the headrail is securely locked and does not slide side to side. Ensure you pre-drill holes before screwing brackets into place to prevent cracking the frame and to provide a secure anchor for the hardware. Following best practices for cutting materials can help avoid damage, much like using a straight edge for clean cuts on LED strip lights. For a smoother installation, you can also spray the window with a soapy water solution to allow for slight repositioning before the film adheres. As with mounting hardware, using a leveling tool ensures the brackets remain perfectly aligned for consistent operation.

What you receive: 6 pieces (3 sets) blind brackets in white, each set has left and right mounting bracket, which can be installed in blind stand, the quantity is enough to meet your needs
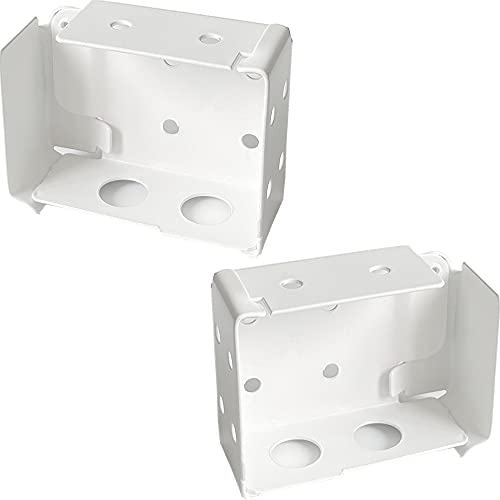
Package: A set(2 pieces - a left and a right) of low profile blind mount brackets, NOT INCLUDE any Screws
Attach the Valance for a Finished Look
To attach the valance for a finished look, start by securely snapping the headrail into place. Then, position clips at every slat ladder for even support—place one at each end and additional clips evenly spaced in between. Snap these clips securely over the front lip of the headrail and center them to ensure symmetrical alignment. For optimal visual balance, consider mounting the rod at least four inches above the window frame. For the valance finishing, tilt the top of the valance inward at an angle, insert it into the tops of the clips, and then snap the bottom into the center channel. Slide the valance slats through the groove, pressing firmly to eliminate gaps and ensure a snug fit. Attach the side returns using L-brackets, bending the sides as needed to cover all mounting hardware completely. Finally, check that the valance is level and that it does not obstruct the movement of the cords for smooth operation. For a sturdy repair approach, use a complete DIY guide to reinforce any loose fittings. Alternatively, consider a magnetic valance hack using self-adhesive magnets glued to the valance back for a streamlined look that avoids visible clips. To ensure the clips stay positioned correctly, use a sturdy outdoor string as a temporary guide line to maintain even spacing during installation.

ONLY Fits for wood or faux wood valances with a 1/2"(12.8mm)GROOVE on the back side.

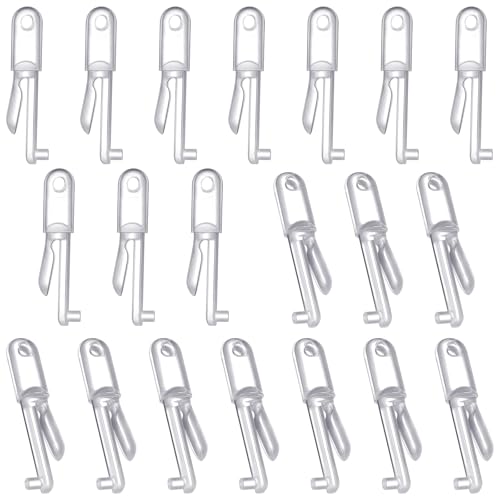
✔【HIDDEN DESIGN】: These clear plastic valance clips are completely blocked by the valance, so they are not easy to be found, creating an invisible effect. So it will not affect the appearance, suitable for your home, shop, or office use.

What you receive: you will get 20 pieces of plastic window valance clips in this package, enough quantity that can meet your daily use and replacement, suitable for your window blind or valance installation
Hook Up the Tilt Wand and Adjust Cords
To hook up the tilt wand, align the wire hook’s 90-degree bend with the top hole of the stem. Push the plastic sleeve up above the hook, then slide the wand onto the hook. Lower the sleeve to lock it in place, ensuring it sits low enough below the rod so the wand doesn’t fall off. Selecting a nursery dresser that fits your space can help keep the room organized. If the tilt feels stiff, try troubleshooting the cords: twist the wand clockwise while gently pulling the back ladder cord. For clockwise movement, pull the back cord; for counter-clockwise, pull the front cord. If dirt has accumulated on the metal rod, wipe it clean before reinstalling it into the tilt mechanism after replacement. Make sure the cords are not twisted or slack when reinserting the rod. Plastic gears are susceptible to breakage and may need replacement if the tilt remains stiff. When determining the correct rod length, curtain rods should extend past the window by at least three to six inches on each side for proper coverage. Finally, reattach the end caps and secure the C-clamps on the opposite side of the headrail to prevent the rod from slipping out.

Range of Applications: white blind replacement wand is of good workmanship, it is smooth on the surface, and the hooks can easily be applied to Most kinds of windows, such as cordless blinds, honeycomb blinds and rolled shades.
Enough for daily use: you will receive a package including 12 pieces horizontal window blinds wand tips, the sufficient quantities are enough to meet your shutter dimming requirements in daily life, which will bring you a lot of convenience

✅【PACKAGE INCLUDE】: You will receive 2 blind wand replacement with hook (including 2 Blind Openers, 2 Handles, and 2 Hooks), enough to use at home and replace your broken window blind tilt wand.
Test Your Mini Blinds by Raising and Lowering
To test your mini blinds by raising and lowering, start by verifying the tension and lift response of the cordless mechanism. Push up smoothly on the bottom rail to raise the blinds; you should feel the cord mechanism engage. Pull down gently to lower them completely or partially. While lifting, rock the blind side-to-side to check the opening and closing functions. Repeat the lift-and-lower motion several times to ensure the tension adjustment resets fully. The blind should rise easily without resistance, indicating proper operation.
Next, confirm that the cord lock engages correctly. Stand directly in front of the blinds, gather the cords, and pull at a 45-degree angle to release the lock. Slowly release the tension, allowing the slats to descend flat. Move the cord back toward the window until you hear a click, which indicates the lock is engaged at the desired height. Use even pressure with both hands to lower the blind in a balanced manner. After completing these steps, your mini blinds should function smoothly and securely.
Fix Common Problems When Slats Stick or Won’t Align
If slats stick or won’t align, start by checking for and clearing any track obstructions. Use a brush attachment on your vacuum to remove dust, dirt, or debris from the track. Wipe away sticky residue with a damp cloth, and for hardened debris, gently use a plastic scraper. Insects, dust buildup, or paint residue can cause misalignment, so a thorough cleaning is essential.
Next, examine the slats for misalignment. Gently lift and reseat bent or crooked slats into their carriers. If they are not aligned with the ladder cord guides, nudge them back into position. You can also twist the stems to restore the proper angle. Additionally, check the gear at the top of the blinds for gear misalignment, as being off by one click can prevent slats from closing fully.
If the slats still stick, lubricate the tilting mechanism and carriers with a silicone spray or WD-40. After applying, open and close the slats several times to help distribute the lubricant evenly. Check the master gear for any damage such as stripping or bending, and replace it if necessary.
For broken slat holes, temporarily tape a paper clip to the damaged area to hold the slat in place. This is a quick fix until you can order a replacement slat. Regular maintenance and cleaning help prevent these issues from recurring.