
Want to add a dimmer switch to control your lights smoothly? The process isn’t too complicated, but safety comes first—you need to shut off the power at your circuit breaker and verify the wires are dead. Once you do that, you can replace your existing switch with a dimmer suited to your bulb type, ensuring proper wiring and wattage limits for safe, flicker-free dimming.
The steps below will guide you through the full process.
Stay Safe Before Installing a Dimmer Switch
To stay safe before installing a dimmer switch, you must turn off the power at the circuit breaker, not just the wall switch. Confirming the correct breaker is off is essential for safety. Locate the breaker feeding the lighting circuit and switch it off. Inform everyone in the house to prevent someone from accidentally restoring power. Afterward, verify that the light does not turn on with the wall switch, and visually check the breaker’s position to ensure it is fully off. Arrange pets or small children in another room or ensure supervision if they remain in the area to prevent accidental contact with electrical components. Even with a stylish vanity or desk setup, ensuring your workspace is properly wired remains critical for safety.
Next, test all wires inside the wall box with a non-contact voltage tester. Hold the tester near each wire; if it indicates voltage, switch the breaker off again and retest. Touch probes between the earth wire and the switch’s top and bottom terminals to check for current. Remove the switch and perform thorough tests on all wires, double-checking that no voltage remains. Skipping these steps can lead to electric shocks, so always confirm power is dead before proceeding.
Tools You’ll Need for the Swap
To swap out your old switch for a dimmer, you’ll need a handful of essential tools. Start with a Phillips-head screwdriver to secure mounting screws, and a flat-head screwdriver for releasing quick-connect wires. Wire strippers are crucial for trimming wire insulation, while needle-nose pliers help twist wires tightly together. A non-contact voltage tester is vital—always confirm the power is off before touching any wiring. Keep electrical tape nearby to tag the common black wire, and use wire nuts to cap off connections securely. A small level ensures your dimmer sits flush and straight, preventing common installation issues like a crooked faceplate. To avoid miswiring, use a camera to document existing wiring before removal, making troubleshooting easier later. Have wire cutters ready to trim excess wire length, and keep the dimmer’s included mounting screws accessible for a smooth, quick swap. Label wires with colored tape to identify their functions for easier reinstallation. For a clearer reflection during the swap, consider how best lighted vanity mirrors provide even illumination to avoid shadows while working on detailed tasks. If the dimmer causes LED bulb flickering, check that the dimmer and bulb are listed as compatible to resolve the issue.

NON-CONTACT DETECTION of AC voltage in cables, cords, circuit breakers, lighting fixtures, switches, non-tamper-resistant outlets, and wires

SAFETY FIRST: It will send out multiple alarms through sound and light. When the voltage is detected, the tip will send out red light and beep. When the higher the sensed voltage is, or the closer it is to the voltage source, it beeps at a higher frequency and the percentage value will be larger. At the same time, the screen will be red or green, red means high voltage and live wire are detected, green means low voltage and null wire are detected

Integrated Voltage tester & Screwdriver - The VTS1000H includes a high-strength steel screwdriver at the tail. This Two-in-One tool is practical for wire checking and everyday electrical projects. It can differentiate between the live and neutral wires in cables and at the outlet, switch, and junction box. Easy to use for breakpoint tests. Safety rating: CAT IV 600V, CAT III 1000V
Choose the Right Dimmer for Your Lights and Wattage
Choosing the right dimmer is essential to ensure smooth operation and longevity of your lights. Start by matching the dimmer type to your bulb’s technology: trailing-edge dimmers are ideal for LEDs, while leading-edge dimmers work better with incandescent or halogen bulbs. Always check that your bulbs are labeled dimmable; using non-dimmable bulbs will lead to flickering or damage.
Next, calculate the actual wattage your LED bulbs draw—not their incandescent equivalent. Don’t rely on the bulb’s replacement wattage; instead, look at the LED’s real wattage. Apply the reduction factor by dividing the dimmer’s maximum rating by 10. For example, a 600W dimmer can support only about 60W of LED load. Exceeding this limit results in overheating and early failure. For a similar principle of managing light and privacy, window film technology allows you to see out while blocking the view in. This process mirrors the way you might remove side stops to access the inner workings of a dresser drawer mechanism.
Ensure your total load stays within the dimmer’s specified minimum and maximum capacity. It’s also wise to keep your load at no more than 80% of the dimmer’s rated capacity for safety and reliability. For instance, with a 200W load, choose a dimmer rated at at least 250W to provide a healthy margin. This approach helps prevent overloads and promotes consistent performance over time. Before starting any wiring, always turn off power at the circuit breaker to avoid electric shock.

Precise Dimming: Achieve the perfect ambiance with precise dimming control using our MOSFET Trailing Edge AC LED Light Dimmer, compatible with both incandescent and DIMMABLE LED bulbs.

LED Dimmer switch: This smart switch implements the Trailing Edge dimmer solution. It is better than other dimmer switches for LED lights. It will bring you a new dimmer experience with larger dimming range, smoother dimming process, and less flickering
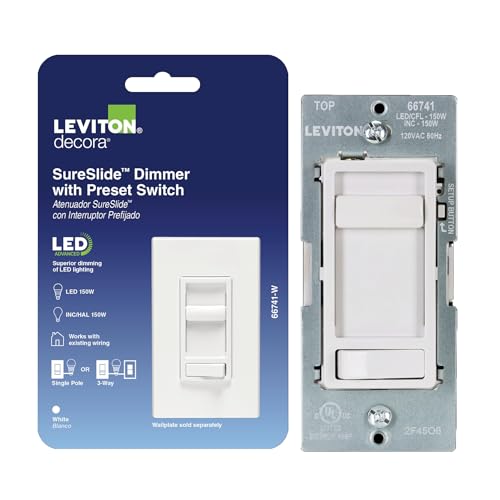
SET THE VIBE – SureSlide Dimmer Switch delivers smooth, reliable lighting control to adjust overhead lights—from bright task lighting to a soft ambient glow to create the perfect atmosphere
Remove the Old Switch and Prep the Wires
To remove the old switch and prepare the wires, turn off the power at the main breaker and verify it is dead with a non-contact voltage tester. When testing, test the voltage tester on a known hot source prior to use to confirm it is working correctly. Unscrew the wall plate, scoring painted edges to protect the finish. Loosen the mounting screws and gently pull the switch out to access the wires.
Inspect the wires for damage; if necessary, cut the ends and strip about a dime’s length of insulation. Form clockwise loops with the wires for the terminal screws to ensure proper connection. Confirm that your wire configuration matches the requirements of the new dimmer. Do not use push-in connectors; instead, wrap the wires securely around the screw terminals for a reliable connection. Clean out any debris or paint from the box edges so your new wall plate will sit flush, giving your installation a neat, finished look. It is also important to choose a dimmer that is compatible with your bulb type and load capacity. Once this is done, you can proceed to match the wires to the correct terminals on your new dimmer. Consider how well-organized storage in a tall dresser can similarly improve your room’s overall aesthetic and functionality.
Match Wires to the Correct Dimmer Terminals
Match your wires to your new dimmer’s terminals by identifying each wire’s purpose and connecting it correctly. Start with wire color identification: black wires are hot, white wires are neutral, and green or bare copper wires are ground. For single-pole setups, connect the incoming black (line) wire to the dimmer’s “Line” terminal, and the outgoing black (load) wire to the “Load” terminal. In 3-way wiring, locate the common wire from the old switch—it connects to the dimmer’s common terminal, usually labeled “BK.” The two traveler wires from the switch connect to the “TR” or “RD” terminals on the dimmer. Remember, red traveler wires are not hot wires; they are travelers between switches. If your dimmer requires a neutral connection, attach all white neutral wires to the “Neutral” terminal. Always double-check terminal labeling to make sure each wire connects correctly and cap any unused wires securely to prevent electrical hazards. For projects using a dimmer, you can first review standard curtain panel sizes to understand typical window measurements if you later switch to simpler window coverings. Connect the black wire to the copper (common) terminal, even if it differs from the original. For an alternative window covering that requires no wiring at all, consider cellular shades for their energy-efficient honeycomb design. Understanding how a window valance adds a decorative top layer to curtains can help you coordinate your complete window treatment style.

SET THE VIBE – Decora Slide Dimmer Switch delivers high-end design with smooth, reliable lighting control to adjust overhead lights from bright task lighting to a soft ambient glow in any room

WHEN QUALITY MATTERS: For flicker-free dimming, the Lutron Ariadni dimmer switch is continuously tested with today's LEDs for flicker-free dimming. Visit Lutron's LED compatibility tool to find the LED bulbs perform the best

Transform— Take a one-switch light and turn it into a dimmable lighting fixture for home or office
Wire and Mount Your New Dimmer Switch
To wire and mount your new dimmer switch properly, start by preparing the electrical box. Remove the existing switch and label its wires to ensure correct connections later. Typically, the wires follow standard color codes: green for ground, black for hot, and red or blue for load. Twist the stripped ends of the dimmer’s wires with the corresponding house wires, then cap each pair with a wire nut to secure them. In a basic single pole setup, ensure you cap off the blue wire as it remains unused. If you are also looking for creative playroom organization, consider using DIY toy storage ideas to repurpose excess wiring boxes. Be sure to vacuum the blinds gently before starting any electrical work to avoid dust buildup in the work area. Considering your window treatments, single cell shades offer a balance of light control and insulation for nearby windows.
Carefully tuck the connected wires back into the box, making sure they are not pinched or overly compacted. This helps prevent wiring issues or damage. Secure the dimmer to the wall box using the provided mounting screws. Begin tightening the screws by hand to keep the unit level and avoid cross-threading. Use a small level to verify the alignment before fully tightening the screws, which results in a professional, flush appearance. Depending on your dimmer model, you may have the option to install it using the screw holes or the included mounting bracket. After the dimmer is level and secured, install the faceplate and snap on the cover to complete the mounting process. Do not turn the power back on until the wiring and mounting are fully finished and verified.

THE GOLD STANDARD IN DIMMING: Lutron’s advanced technology provides smooth LED dimming used for everyday light bulbs to reduce flicker, buzz, and delay to enhance comfort and ensures consistent dimmer switch reliability across LED lighting

CONVENIENT - an easy way to create a big impact for a minimal cost and customize the light level in any room, for any occasion and in any home

SET THE VIBE – Toggle Slide Dimmer Switch delivers smooth, reliable lighting control to adjust overhead lights—from bright task lighting to a soft ambient glow to create the perfect atmosphere
Turn Power On and Test the Dimmer
After you’ve fully mounted the dimmer switch and secured the wall plate, restore power by flipping the circuit breaker back to the “ON” position at the main electrical panel. Before touching any wires, confirm the circuit is live for safety. Use a non-contact voltage tester near the switch terminals; it should beep or light up, indicating power is on.
Next, test the circuit functions properly. Turn the dimmer to its lowest setting—the bulb should emit a faint glow at minimum brightness. Gradually increase the dimmer setting to full; the light should smoothly reach maximum brightness without flickering. It should also turn off completely when the dimmer is set to the lowest or off position. Listen for any buzzing sounds; if you hear buzzing, it could mean the bulb is incompatible with the dimmer. If flickering occurs, check that the dimmer is rated for the specific bulb type, as compatibility issues often arise from mismatched dimmer types with fixtures or bulbs. For added stability, consider using rod brackets designed for heavy-duty support if your fixture requires secure mounting. This approach mirrors the practical guidance used for selecting the right hardware for drapery installations. Using wooden boards as a backing plate can provide a sturdy mounting surface similar to a DIY clothing rack.
Finally, verify voltage with a multimeter set to AC 200V. Probe the ground and line terminal to confirm around 120 volts. Then, check the load terminal while adjusting the dimmer to ensure consistent voltage flow. These steps confirm that the dimmer is operating correctly and the circuit is safe to use.
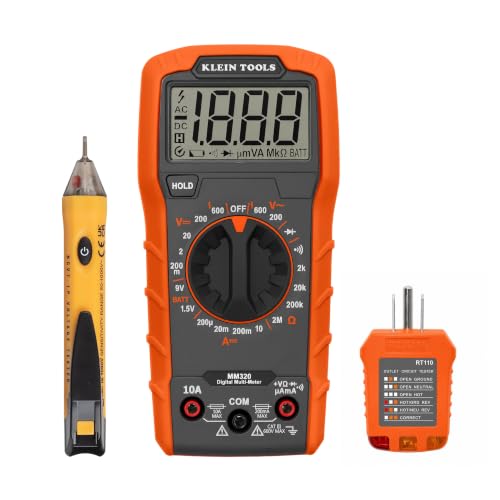
VERSATILE MULTIMETER: Measures up to 600V AC/DC voltage, 10A DC current, and 2MOhms resistance

Be aware of voltage easily - the tip glows red and a beeper sounds when voltage is detected

VERSATILE VOLTAGE DETECTION: This Voltage Tester offers non-contact detection of low voltage in security, entertainment, communications, environmental control, and irrigation systems