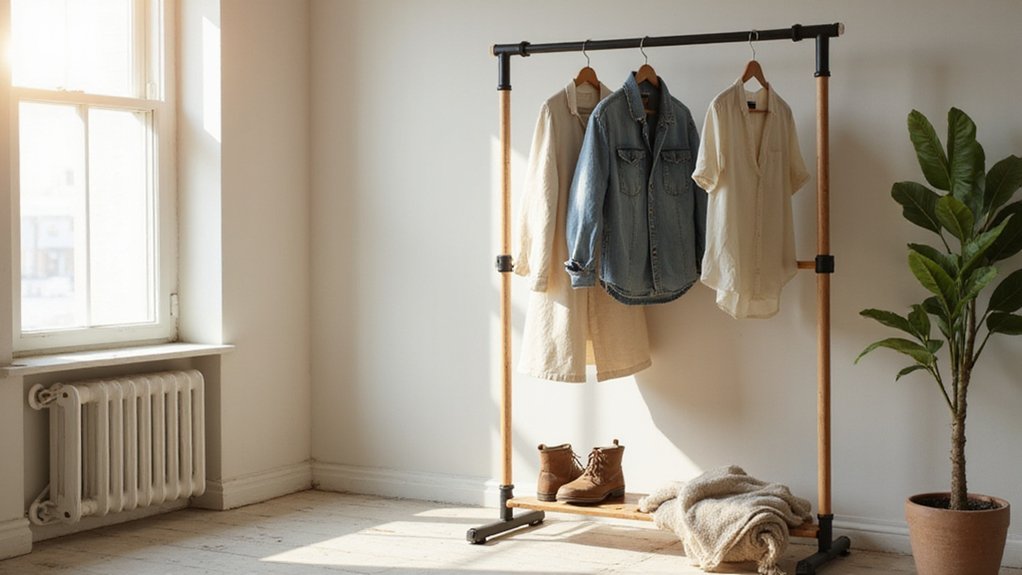
If you’re tired of cluttered closets and want a sturdy spot to hang your clothes, building a DIY clothing rack might be just what you need.
In just a weekend and with some basic tools, you can create a functional and stylish rack tailored to your space.
Whether you prefer heavy-duty steel or lightweight copper, this project is accessible and customizable.
The full steps are right below to help you get started.
Pick the Best Materials for a DIY Clothing Rack
The best materials for a DIY clothing rack depend on the weight of your garments. For heavy winter coats, steel conduit pipes are ideal because they are highly durable and resistant to bending. They can support more weight than 1¼-inch wooden dowels, making them a reliable choice for bulkier clothing. While steel tends to be more expensive upfront compared to wood, it often saves you money over time by reducing the need for repairs or replacements. You can attach floor flanges to a sturdy base, such as an old armoire drawer front, ensuring stability. For a DIY rack, using 3/4 inch galvanized pipes provides enhanced sturdiness and rust resistance, capable of supporting up to approximately 175 lb. Copper pipes offer a decorative and stylish look but are not as strong as steel, making them better suited for lighter garments or decorative purposes. For seasonal or lighter clothing, PVC pipes are a cost-effective option, although they lack the long-term durability of metal. If you also need a spot to sit while organizing your clothes, a storage ottoman can double as both seating and hidden storage. Matching the material to your heaviest garments ensures your rack won’t wobble or sag over time.

Rockler Pipe Clamp Rack:Put an end to that pile of woodworking clamps leaned up in the corner! This new heavy duty clamp rack from Rockler stores your pipe and bar clamps firmly on the wall so you can stay organized.

【Industrial Style】The industrial pipe towel rack looks awesome and is suitable for rustic and vintage home décor. It's really a great addition to farmhouse bathroom!!

【3/4" EMT CONNECTOR】Chain link fence fittings end rail clamp suits for connecting 3/4 Inch EMT Conduit. It is designed to natively fit electrical conduit which is readily available at your local hardware store.
Measure and Cut Your Wood and Pipe Sections
To measure and cut your wood and pipe sections accurately, start with specific dimensions to ensure a stable frame. For the main platform, use 2-inch by 8-inch boards and cut them to at least 52 inches in length. Mark the boards so that pipe flanges will be centered before cutting, and double-check your measurements to prevent any misalignment. For a more durable and aesthetically pleasing alternative, use maple 1×4 lumber for the legs and supports, which are often glued and ripped for strength. If you prefer a multi-functional piece, consider how the dimensions compare to a vanity or desk for your space. For maintaining the wood’s finish, dust with a soft cloth to prevent buildup before assembly. Pay attention to the color temperature of your work lighting to avoid measurement errors.
For the supports, cut three 19-inch pieces from 2-by-6 lumber. The vertical supports should be 3-foot and 4-foot sections, depending on your desired rack height. For the crossbars, cut 31-inch lengths for hanging, and for the top frame, cut 48-inch sections to connect with bushings and 8-inch nipples.
Use a hacksaw or PVC cutter to make clean cuts on all pipe sections. Always sand the edges immediately after cutting to prevent snagging and ensure smooth connections. Confirm that your wood measurements match the pipe lengths you plan to use, as precise alignment is key to a stable, secure frame.
Drill Pilot Holes for Screws and Dowels
To drill pilot holes for screws and dowels, first match your drill bit to the screw’s shank, not its full diameter. The core of the drill bit should hide behind the screw’s threads, which should protrude slightly to ensure compatibility with your screw type. Drill to the minor diameter of the threads—using a bit that’s too large will weaken grip strength and compromise hold. This method prevents wood from splitting and ensures a straight path for the screw. Keep in mind that inconsistent power delivery from a dimmer can cause LED bulb flickering, which can be a distraction during precision drilling. You can avoid splitting wood entirely by using pilot holes combined with wood glue for a stronger joint. For curtain rods, standard sizes typically range from 28 to 120 inches to accommodate various window widths.
For dowels, drill a pilot hole using a small bit through an alignment block to keep everything straight. Before drilling the main hole, create a countersink to allow the dowel to sit flush. Then, drill an 8 mm hole for the dowel, being careful not to drill all the way through the wood. Use a matching bit and a hardwood dowel to enlarge existing holes if needed. Insert the dowel, then apply glue, and trim excess once it sets. Keep your drill perpendicular and steady throughout the process to ensure accuracy.
Assemble the Wood-and-Pipe Base Frame
To assemble the wood-and-pipe base frame, you’ll need your drill, pipe wrenches, and a screwdriver. Start by centering your floor flanges on the 2-inch by 6-inch platform, then mark the spots where your pipes will go, ensuring they’re spaced according to your plan. Attach scrap wood perpendicular to the bottom of the assembled pipe frame with six screws per flange, totaling 12 screws, to provide extra stability—don’t skip this step. This design parallels the closet flange method for securing the base to a stable surface. Next, position the casters along the outside edges of the platform for balanced support and secure each with #12 round head screws. Before tightening all connections, insert the vertical pipes into the flanges, then tighten everything with your wrenches until it’s snug. To personalize your base frame, consider spray paint or stain to match your room’s style before final assembly. Choosing the right ceiling light can similarly anchor the overall aesthetic of a room after your base is complete. Consider how style and cost trade-offs will affect your final design, just as you would when selecting a lamp or table for a room. For a professional finish, always check the electrical requirements before beginning any installation. Once all parts are securely connected, your base frame will be sturdy and ready for the next steps.

·Industrial Vintage Design: This industrial pipe clothing rack are made of strong iron pipe, come along with pipe flange, Exposed pipes and joints create a bold steampunk aesthetic which is can transform your space with it, not only that, but this rack blends function and style

INDUSTRIAL CHIC DESIGN – Elevate your space with iron pipe clothing rack blending rustic wood and industrial metal. Perfect for modern bedrooms, steampunk-themed stores, or boutique displays.

Heavy Duty Durable Construction: made of thickened 3/4" industrial grade metal pipes and natural solid wood, the 4-way garment rack is anti deformation and high load-bearing, easily holding heavy winter clothes and bulk retail goods for long-term use
Build the Top Rail and Support Structure
You should start by selecting the appropriate materials for building the top rail and support structure. For a solid wood top rail, use 1×4 inch or 1×6 inch maple boards or lumber. If you prefer a pipe-based rack, install 6-inch pipe nipples into tee fittings and secure horizontal connections with metal joints. To ensure proper alignment, mark 9 inches down from the top of each A-frame leg to drill pilot holes. Assemble two vertical supports first to keep the frame square, tightening each leg piece with a pipe wrench to avoid wobbling. For example, cutting the metal pipes to length is possible but requires a hacksaw or pipe cutter for LED strips to achieve a clean edge. Applying DIY window film is another straightforward project where you can cut costs by purchasing materials and installing them yourself. For a clean appearance, keep the fabric away from dust by using a gentle vacuum attachment during the construction process.
Use an assembly line approach on a work table to ensure consistent construction of horizontal supports. Connect two 36-inch pipes with a tee and an elbow to form each L-shaped rail side. Attach horizontal supports to wall flanges, then add uprights for stability. Before screwing supports in permanently, drill pilot holes with a level to confirm proper alignment. This method guarantees a sturdy and level support structure for your build.

【MATERIAL】: Light beige color maple wood with beautiful grain. Unfinished, hard, dense and tight-grained maple lumber board. High strength, easy to cut, shape and sand.


Solid Hardwood - Select White Hard Maple
Sand, Stain, and Finish for a Polished Look
After building your frame, start by sanding the wood with coarse-grit paper to remove old finishes. Follow with 240 grit for a smooth surface, always sanding with the grain to avoid scratches. Wipe away all dust with a damp cloth, then clean the piece thoroughly with warm soapy water. Before staining, perform a final wipe-down with TSP to eliminate residual oils that can interfere with color absorption. For a similar finish, consider faux wood blinds as an alternative window treatment. Be mindful that lighting conditions, such as those from a can light vaulted ceiling, can dramatically affect how the stain color appears. Just as with dimmer switches, controlling the intensity of light can help you preview how the final color will look in different moods.
Next, consider matching your stain color to your room’s decor. Apply the stain using a brush for corners and a rag for flat surfaces. Let the stain sit for about one minute, then wipe off the excess evenly. For a darker finish, layer multiple coats once the previous layer has dried. After the stain has fully dried, apply a clear polyurethane top coat to protect the wood and enhance its shine. Stir stain thoroughly without shaking to avoid bubbles that could mar the finish.
Choose your hardware to coordinate with your finish. Metal hardware should match the stain tone, while wood hardware can add warmth or contrast as desired. Allow the finished piece to dry completely overnight before handling or installing to ensure durability.

PROTECT WOOD SURFACES – Minwax Polyurethane Wood Finish Aerosol spray protects interior projects, including woodwork, furniture, floors and cabinets. Clear top coat is one of the most durable coatings for wood protection against scratches, spills & more.

PROTECT WOOD SURFACES – Minwax Polyurethane Wood Finish Aerosol spray protects interior projects, including woodwork, furniture, floors and cabinets. Clear top coat is one of the most durable coatings for wood protection against scratches, spills & more.

PROTECT WOOD SURFACES – Minwax Polyurethane Wood Finish Aerosol spray protects interior projects, including woodwork, furniture, floors and cabinets. Clear top coat is one of the most durable coatings for wood protection against scratches, spills & more.
Install Wheels on Your DIY Clothing Rack
You should install four industrial casters with 3- to 5-inch diameters to give your clothing rack mobility. These sizes provide a good balance of stability and easy movement across surfaces. Similarly, mid-century modern nightstands are often designed with tapered legs for stability and style. Attach each caster using four-hole flanges, hex bolts, washers, and nylon nuts for a secure fit. Position each caster four inches from the base trim to prevent interference and ensure smooth operation. Unlike a lava lamp that must remain stationary, these casters allow your rack to be moved freely. A similar concept applies when choosing best bead curtains for doors, which are designed for easy repositioning rather than permanent placement. Mark and pre-drill pilot holes carefully for each caster, making sure not to drill through the entire frame. Use round head #12 screws to secure the wheels into the wooden supports, avoiding over-tightening that could crack the wood. Integrate wheel locking mechanisms on the front casters and lock them immediately after attachment. Test the brakes before loading the rack to confirm it stops effectively and prevents wobbling during movement. This ensures your DIY clothing rack stays stable when needed and moves effortlessly when desired.

Heavy Duty Casters - Premium Materials and Greater Durability: Precision ball double bearings for smooth swiveling and rolling. 3″caster wheels are made from solid polyurethane with strong weight capacity. Each caster can carry 250Lbs.
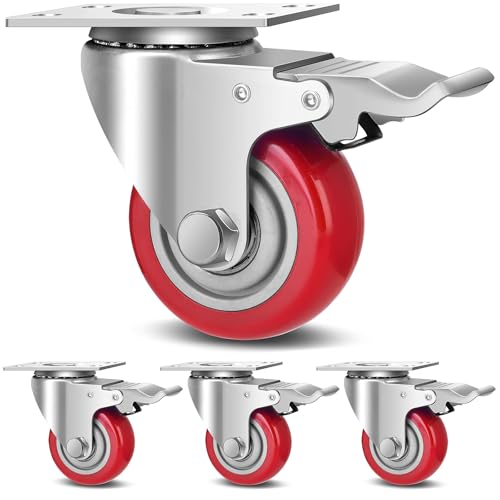
[Rotate 360 degrees] Smooth & Silent & Sturdy. The total locking brake locks both the wheel and the swivel.

❉ 【Upgraded Materials and Processes】 ANDUTEES The upgraded heavy duty casters feature widened wheels and a low gravity center design for smoother operation, making them suitable for heavy-duty workbenches.
Add Bracing and Hooks to Prevent Tipping
To prevent your clothing rack from tipping, install diagonal cross braces of 1×3 lumber between the base units. Cut each brace with a 55-degree angle at both ends for a snug fit. Glue and nail two of these braces in an X-pattern on the inside of the back of the bottom rack section. This reinforcement provides maximum stability, aligning with safety standards often used in retail environments. For practical bottom storage, you can incorporate cane baskets from Galma to hold accessories or shoes. Additionally, these storage baskets are often highlighted as top picks for organizing your space.
Next, focus on weight distribution by cutting vertical supports with a 16-degree angle at one end. Arrange these supports in a “V” shape, with six-inch legs inside the base of the rack. Attach hooks to the vertical supports—install two on each side using pilot holes and screws. Position these hooks to hold baskets or dividers. Doing so lowers the rack’s center of gravity, helping maintain balance and preventing tipping during daily use. This method combines structural bracing with functional hooks for a safer, more stable clothing rack.